HOW WE CAN HELP?
KoBoToolbox – Overview
What is KoBoToolbox?
KoBoToolbox is an open-source tool, used for mobile data collection in challenging environments. It is especially useful to humanitarian and development organisations, aid workers and researchers in the global south. Field data is collected using mobile devices such as phones and tablets, but can also be collected via web forms (using Enketo) by sending out a link.
Why use KoBoToolbox?
- Great user-friendly interface
- You do not need to learn complex coding languages to use it
- It can work both online and offline
- Data analysis and visualisation is done in real time
- Easy data exportation to MS Excel or statistical software for further analysis
- Minimises data entry errors since data validation can occur in real time during data collection
- It is free!
How to use KoBoToolbox: A step by step guide
Step 1: If you have not done it yet, create an account on KoBoToolbox. There are two options, one hosted by OCHA (on a server in Ireland) for humanitarian organisations, and one hosted by the Harvard Humanitarian Initiative (hosted in the USA) for everyone else. The latter has some storage and usage restrictions.
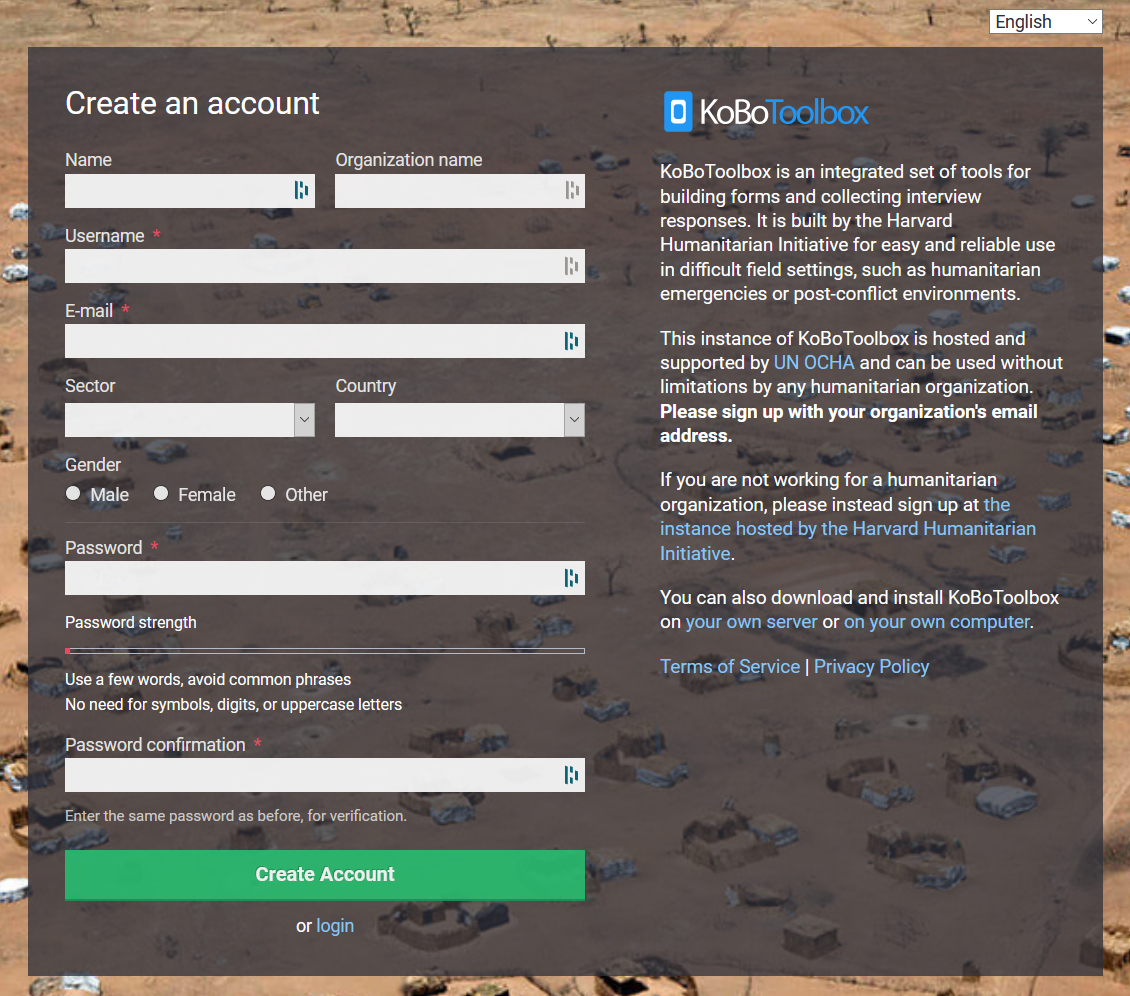
Fill out the form (the same on both instances) and activate your account by clicking on the link you will receive by email.
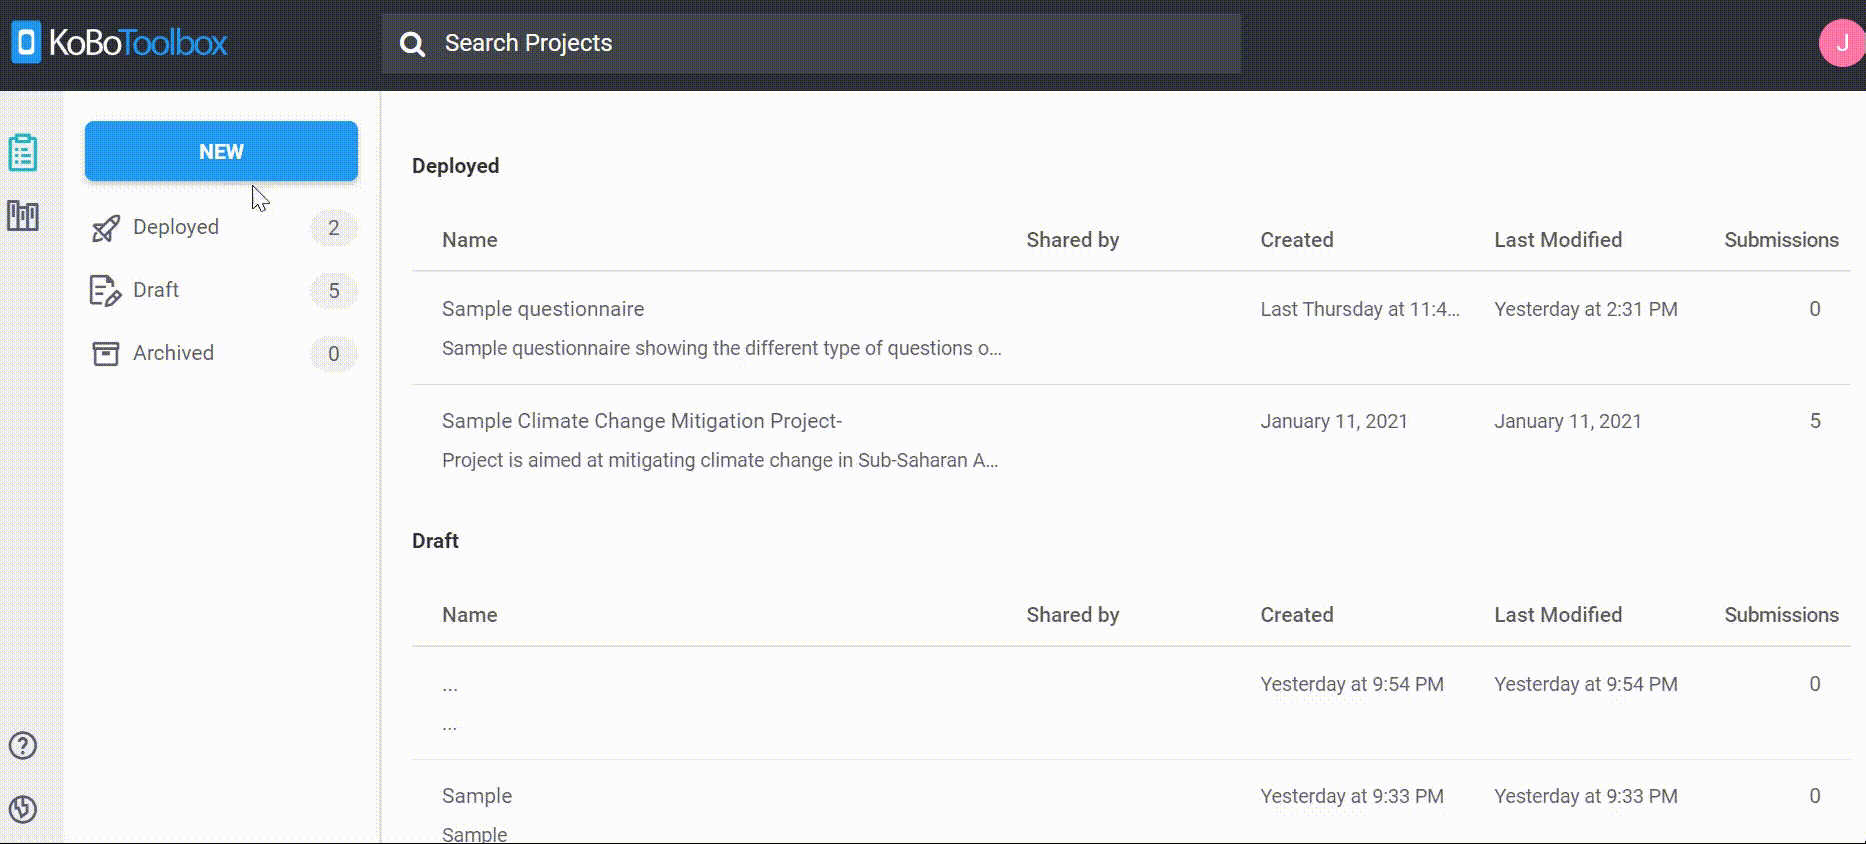
Step 2: Click on new to create a new form
Step 3: Choose a source (Build from scratch option)
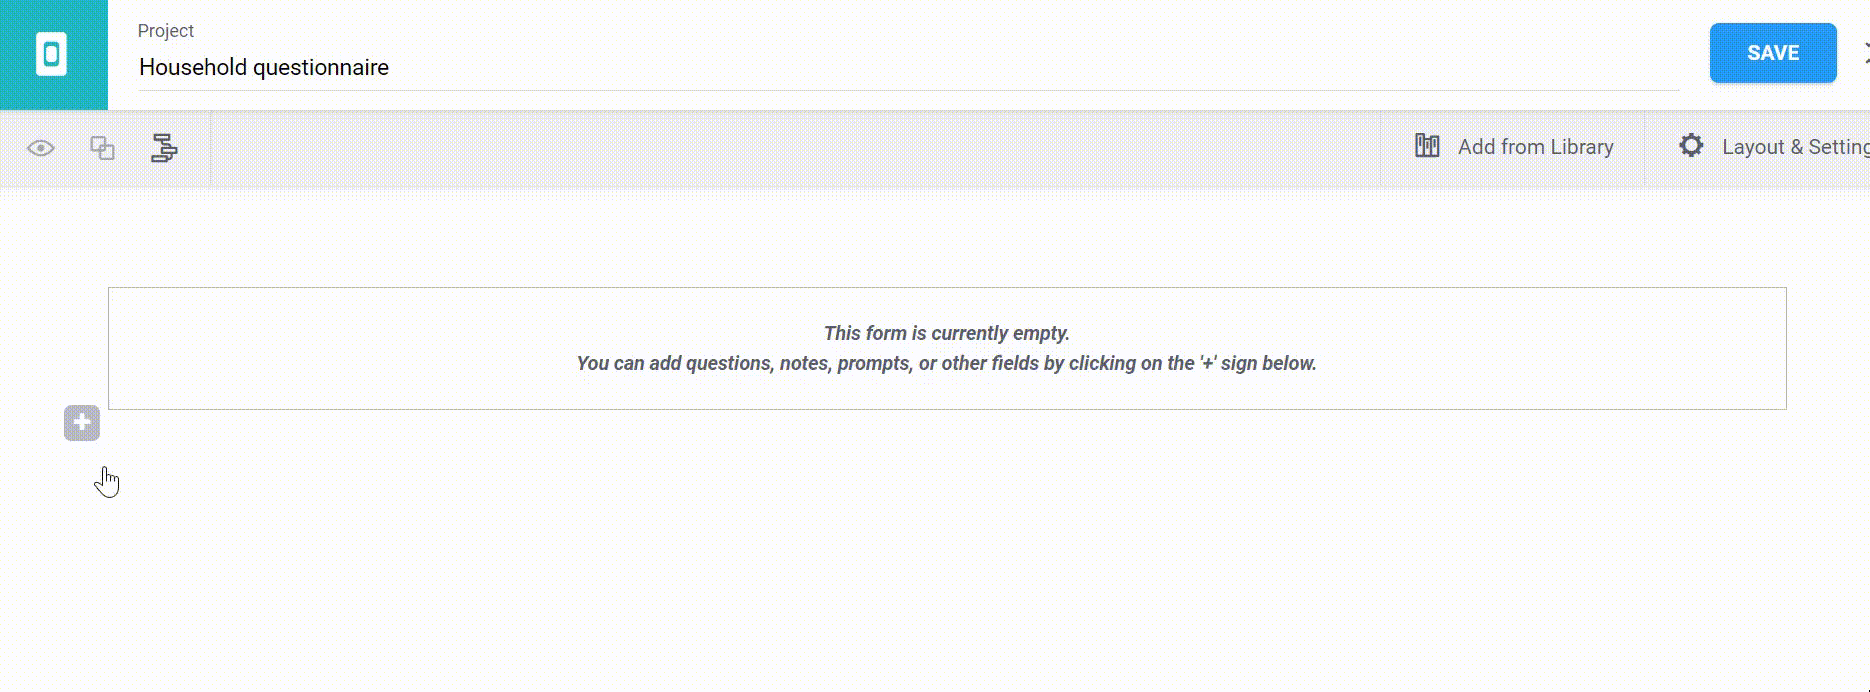
Step 4: Enter the project details in the highlighted area, then click on the ![]() button.
button.
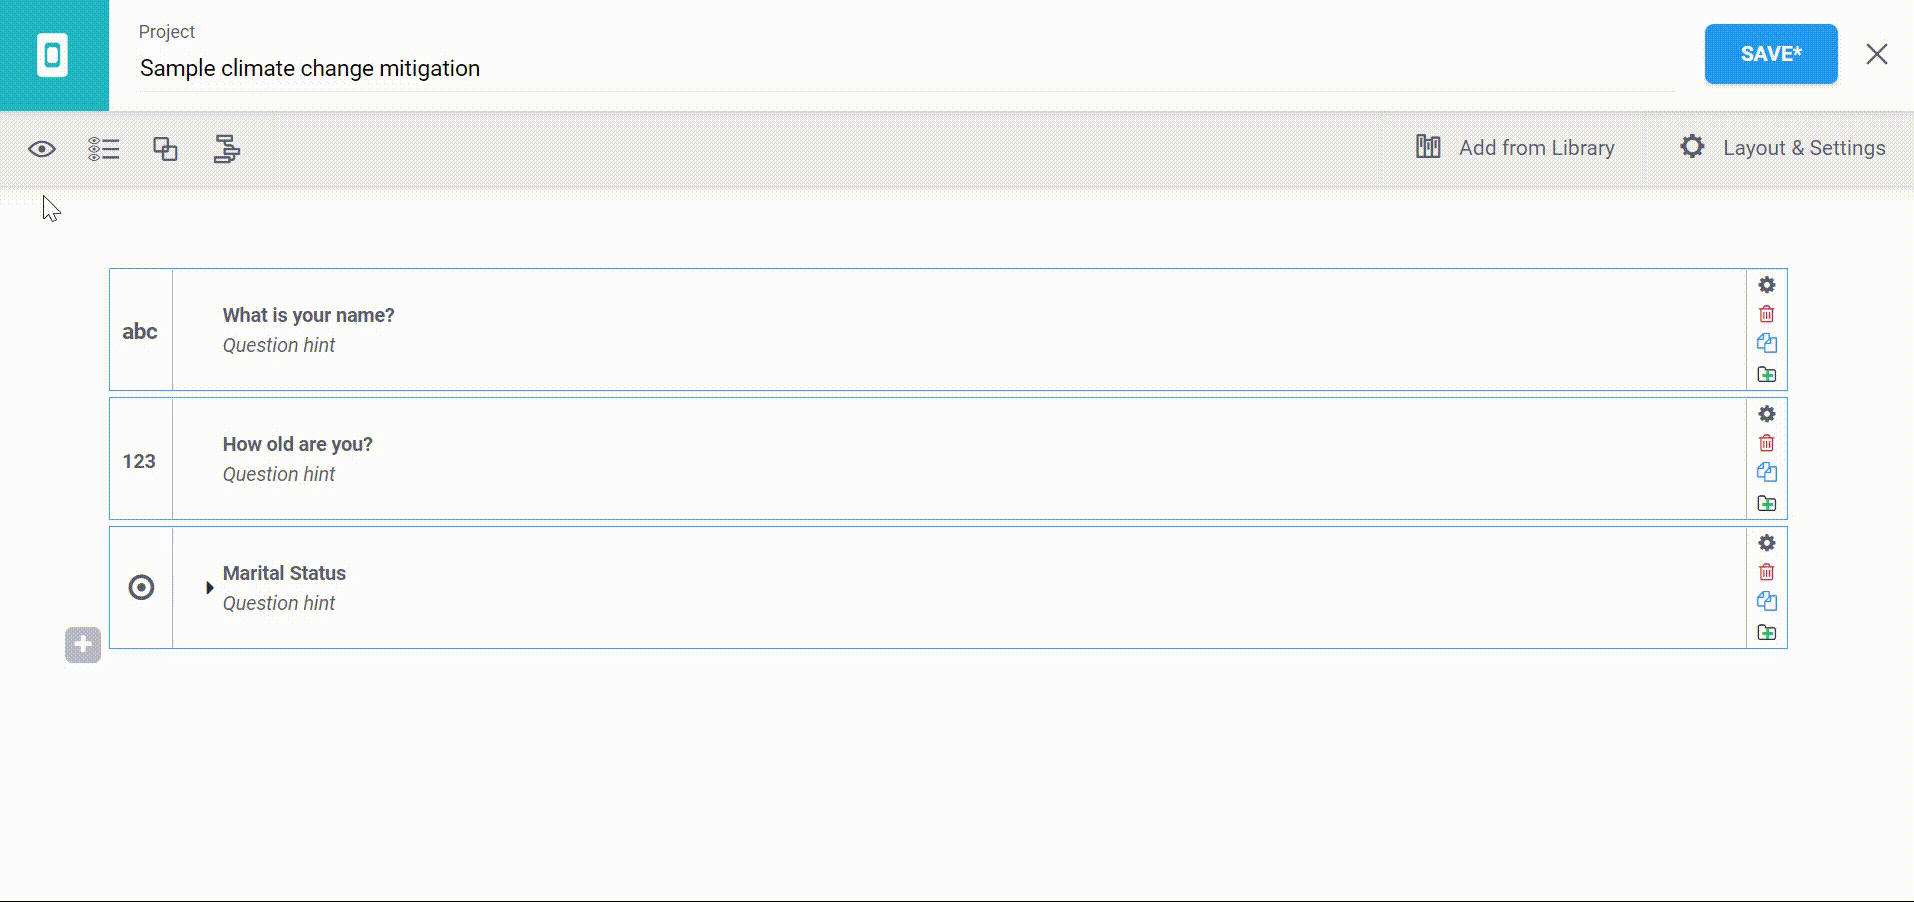
Step 5: Click on the ![]() button to add new questions
button to add new questions
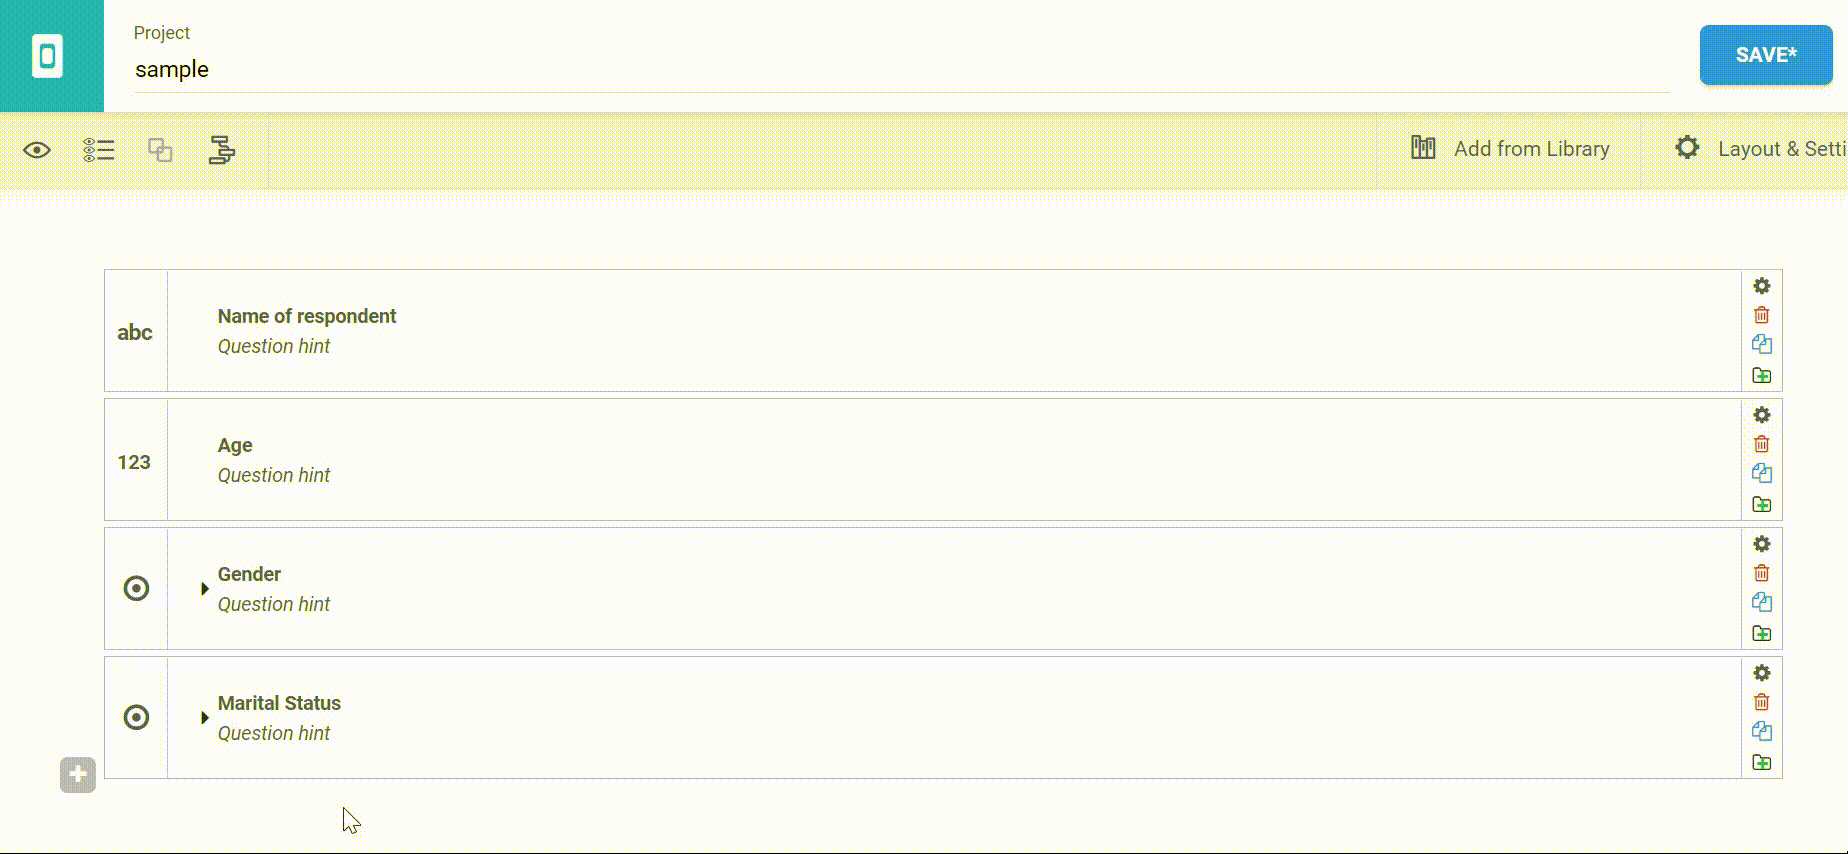
Step 6: Type out your question, then click ![]() button. Choose the type of question you want.
button. Choose the type of question you want.
Types of Questions in
| Questio Type | Answer input |
|---|---|
| Multiple choice question; only one answer can be selected. | |
| Multiple choice question; multiple answers can be selected. | |
| Free text response e.g. name | |
| Integer (i.e., whole number) input (max 9 digits). | |
| Decimal input. | |
| Date input. | |
| Time input. | |
| Accepts a date and a time input | |
| Collect a single GPS coordinate. | |
| Take a picture (image). | |
| Take an audio recording. | |
| Take a video recording. | |
| Geotrace. Record a line of two or more GPS coordinates | |
| Display a note on the screen, takes no input. | |
| Scan a barcode/QR Code; requires the barcode scanner app to be installed. | |
| Acknowledge prompt that sets value to “OK” if selected. | |
| Record a polygon of multiple GPS coordinates; the last point is the same as the first point. | |
| Rate questions | |
| It only works on Enketo webforms and uses the grid style. | |
| Creates a ranking. | |
| Perform a calculation. Calculate questions are not displayed on your form, but they are executed automatically as your form is being answered | |
| Hide questions | |
| Upload a file (txt, pdf, xls, xlsx, doc, docx, rtf, zip) | |
| Enter a number within a specified range |
Note: To learn in detail about the different question types, visit our specific article for that.
Step 7: To group questions into sections, hold on to the control key on your computer, then select the questions. Afterwards, click on the group icon as shown. The group name can be changed by double clicking on it.
Note: Grouping questions is important as it puts related questions under the same subheading (sections). Therefore, your survey looks organised.
Other Useful Functions on Form Ribbon
![]() This function is used to expand/collapse questions.
This function is used to expand/collapse questions.
![]() This function is used to import cascading select questions (choice filters); the answer of one question determines the options presented in the next question. For example, ‘What State do you live in?’ > ‘What City do you live in?’ What neighborhood do you live in?’
This function is used to import cascading select questions (choice filters); the answer of one question determines the options presented in the next question. For example, ‘What State do you live in?’ > ‘What City do you live in?’ What neighborhood do you live in?’
It is commonly used for advanced surveys.
![]() This function is used to adjust the form styles e.g., single page, grid theme etc. and contains the form’s metadata. Metadata is a set of data that gives information about other data.
This function is used to adjust the form styles e.g., single page, grid theme etc. and contains the form’s metadata. Metadata is a set of data that gives information about other data.
Step 8: Click on the ![]() icon to preview your form, then click on the
icon to preview your form, then click on the ![]() button at the very end of the form preview in order to validate it. If satisfied, save the form by clicking the
button at the very end of the form preview in order to validate it. If satisfied, save the form by clicking the ![]() button.
button.
Click on the ‘X’ button to close the form.

Note: An asterisk on the ![]() button indicates that you have unsaved changes on your survey. Always remember to save often.
button indicates that you have unsaved changes on your survey. Always remember to save often.
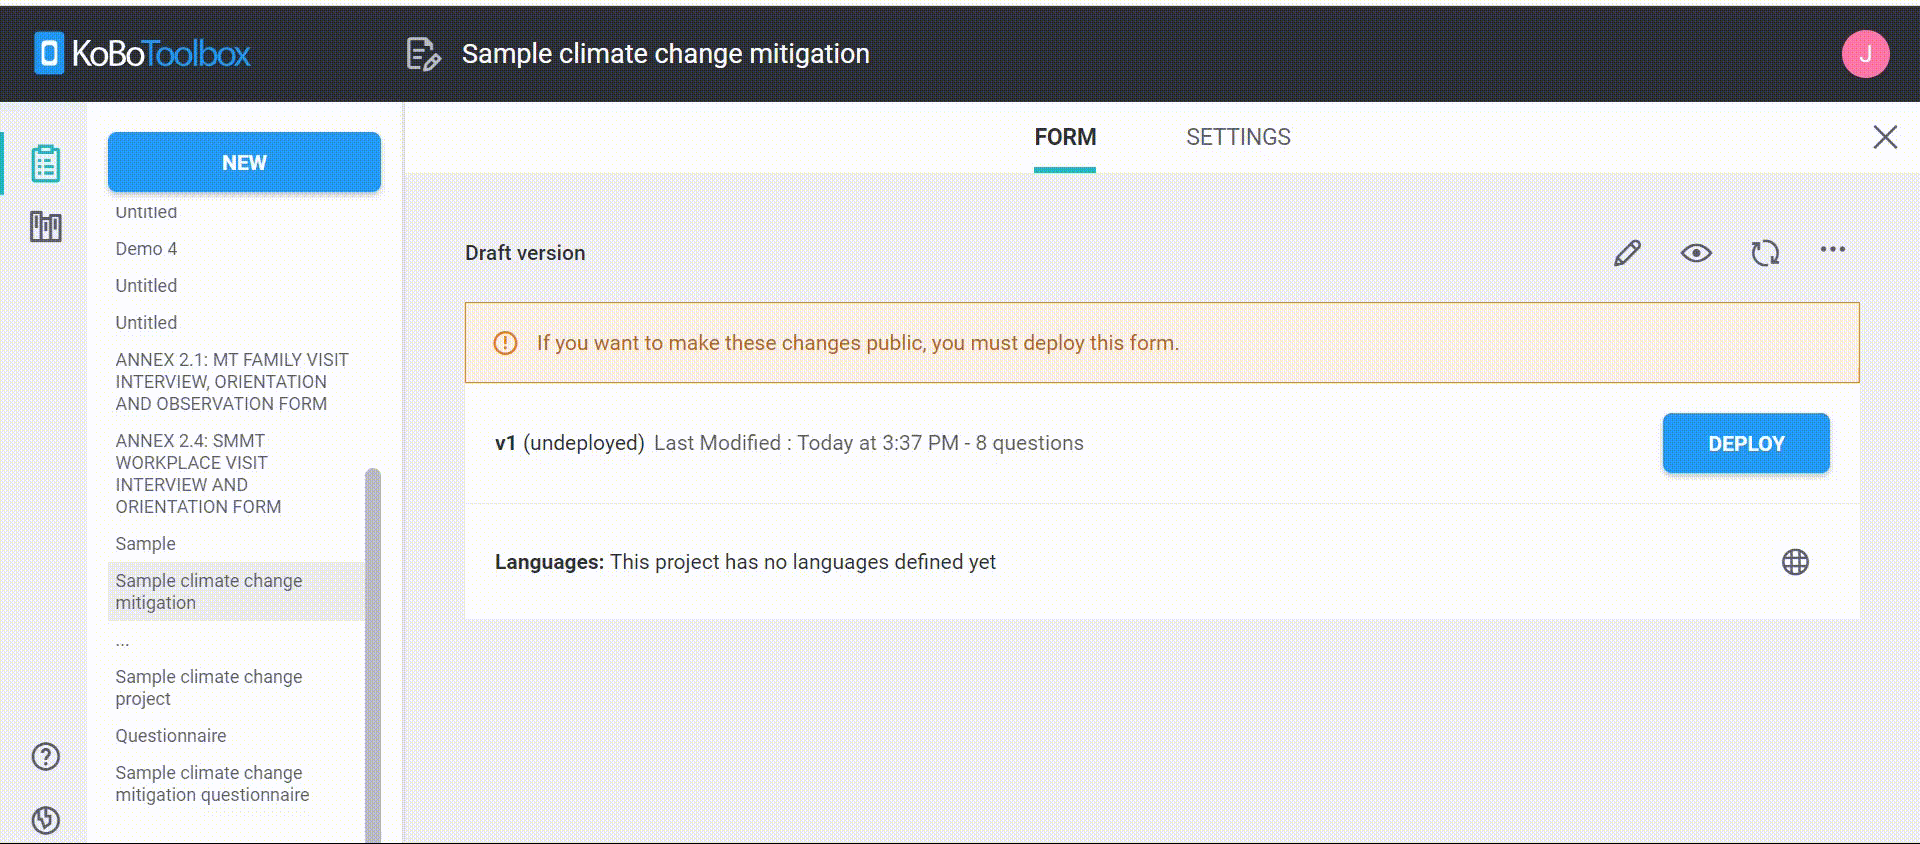
Step 9: The form is now ready to be deployed (launched) for data collection. Simply click on the ![]() button to dispatch the questionnaire.
button to dispatch the questionnaire.
To fill the form on Enketo as a web form, click on the Form tab, and scroll down to the collect data section. Click on the drop down to see the various options.
However, it is preferred that you leave the collect data section in the default settings for the form to accept both online and offline submissions. Click on open, the survey opens in another tab. You can as well click on copy, to share the link with others to begin data collection.

After you’ve finished filling the questionnaire on Enketo, click on the ![]() button at the bottom of the form to submit it.
button at the bottom of the form to submit it.
Note: In the top left corner appears a 1 when you click submit, once the survey was successfully transmitted, it will jump back to 0. This means, that once you loaded the survey, you do not need a connection, and you click submit even without a connection, it will be send as soon as you have a connection again.
Managing Translations in KoBoToolbox
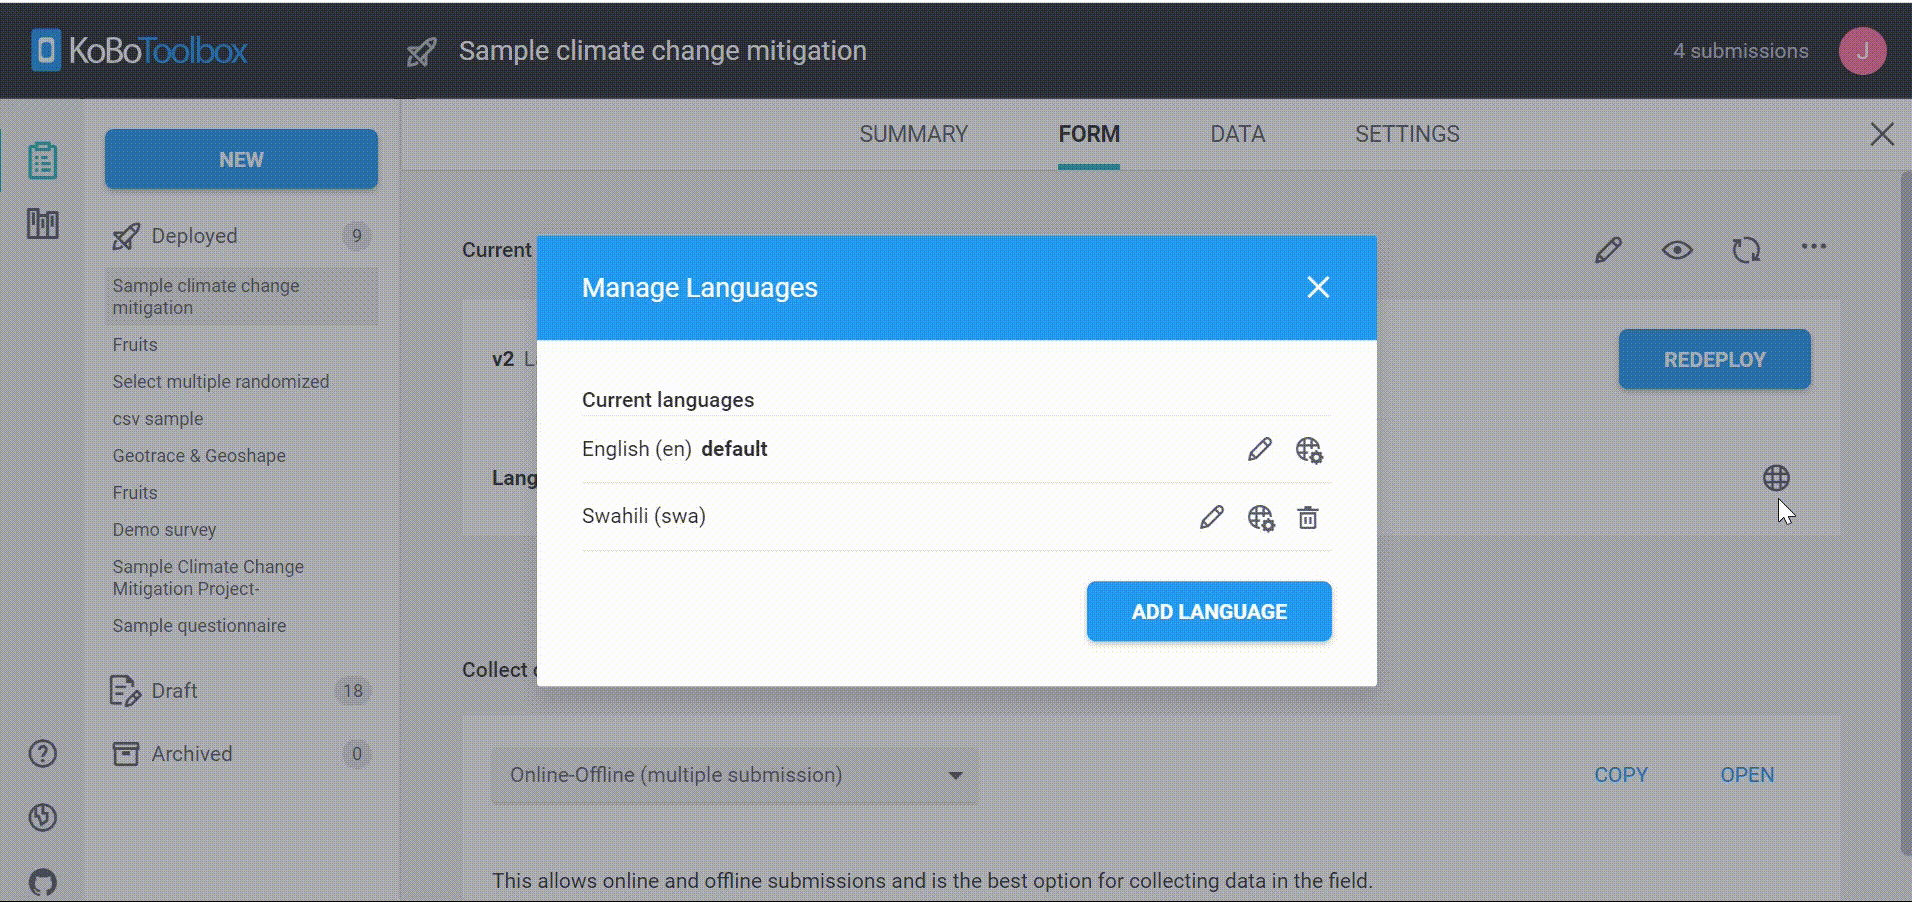
To manage translations: click on ![]() icon in the Form tab, a pop-up window appears with an option to manage languages. Fill in the default language name e.g., ‘English’ and default language code ‘en’, then click on the
icon in the Form tab, a pop-up window appears with an option to manage languages. Fill in the default language name e.g., ‘English’ and default language code ‘en’, then click on the ![]() button.
button.
To add a new language e.g., Swahili, type it out in the respective fields as shown, with the corresponding language code (swa). Thereafter, click on the ![]() button to add it.
button to add it.
To update (manage) translations:
- Click on the
 . A pop-up window appears prompting you to manage languages.
 - Click on the
 icon so as to add translations. A translations table Fill in translations in the shaded light-green region, then click on the
  button.
Step 10: Connecting KoBoToolbox to ODK Collect or KoboCollect (works the exact same)
- Visit Google play store and download ODK Collect / KoboCollect, and install it. After installation, open the app and click on the 3 dots
 at the top-right hand corner.
 - Thereafter, click on ‘General Settings’ function
- In general settings, select ‘Server’
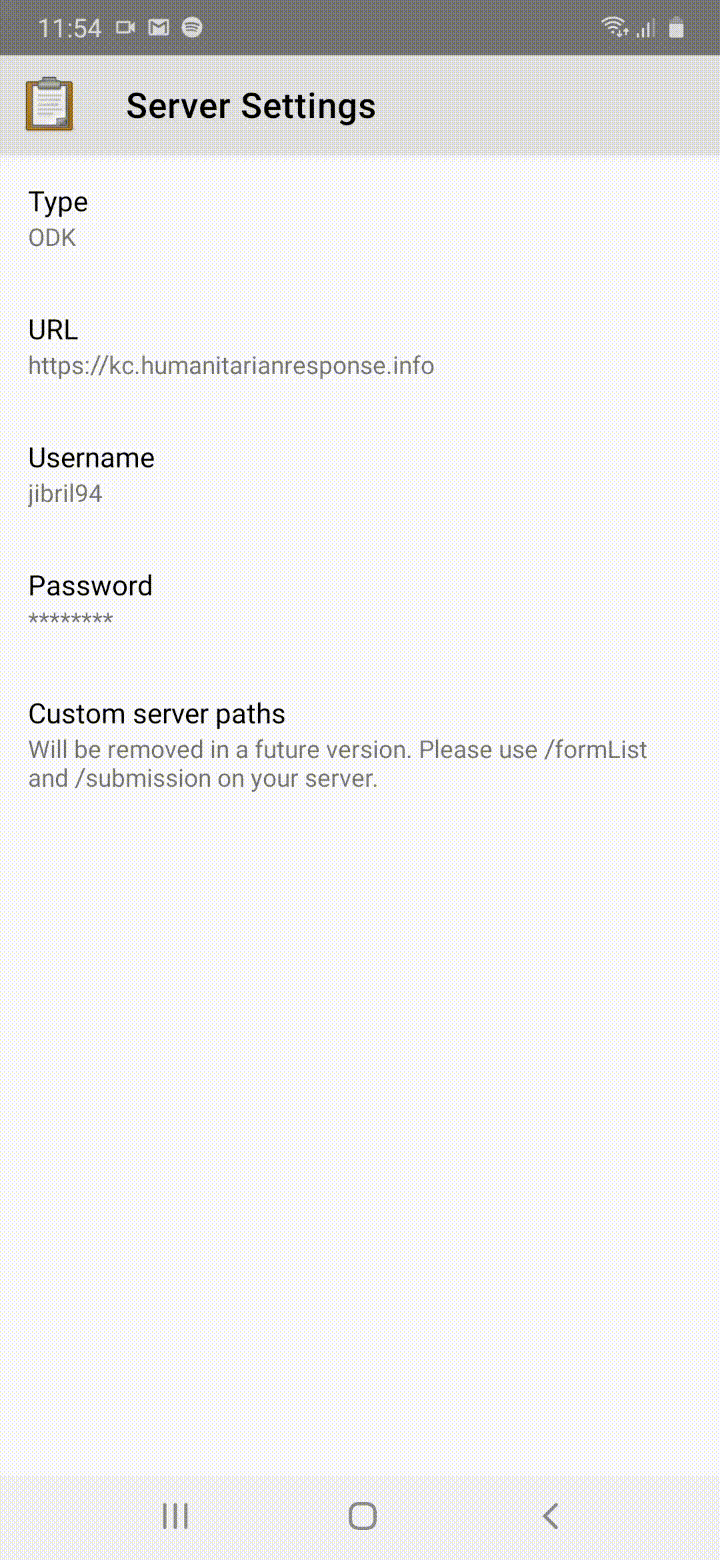
- Under the server settings, change the URL to https://kc.humanitarianresponse.info/ or https://kf.kobotoolbox.org (depending which account type you have) proceed to add your username and password (These are your KoBoToolbox log in credentials).
- Proceed to click on the back button on your phone to go back to ‘General settings’, then click on ‘Form management’ to set your desired preferences e.g., changing auto send option to ‘wifi only’ or ticking the checkbox ‘delete after send’
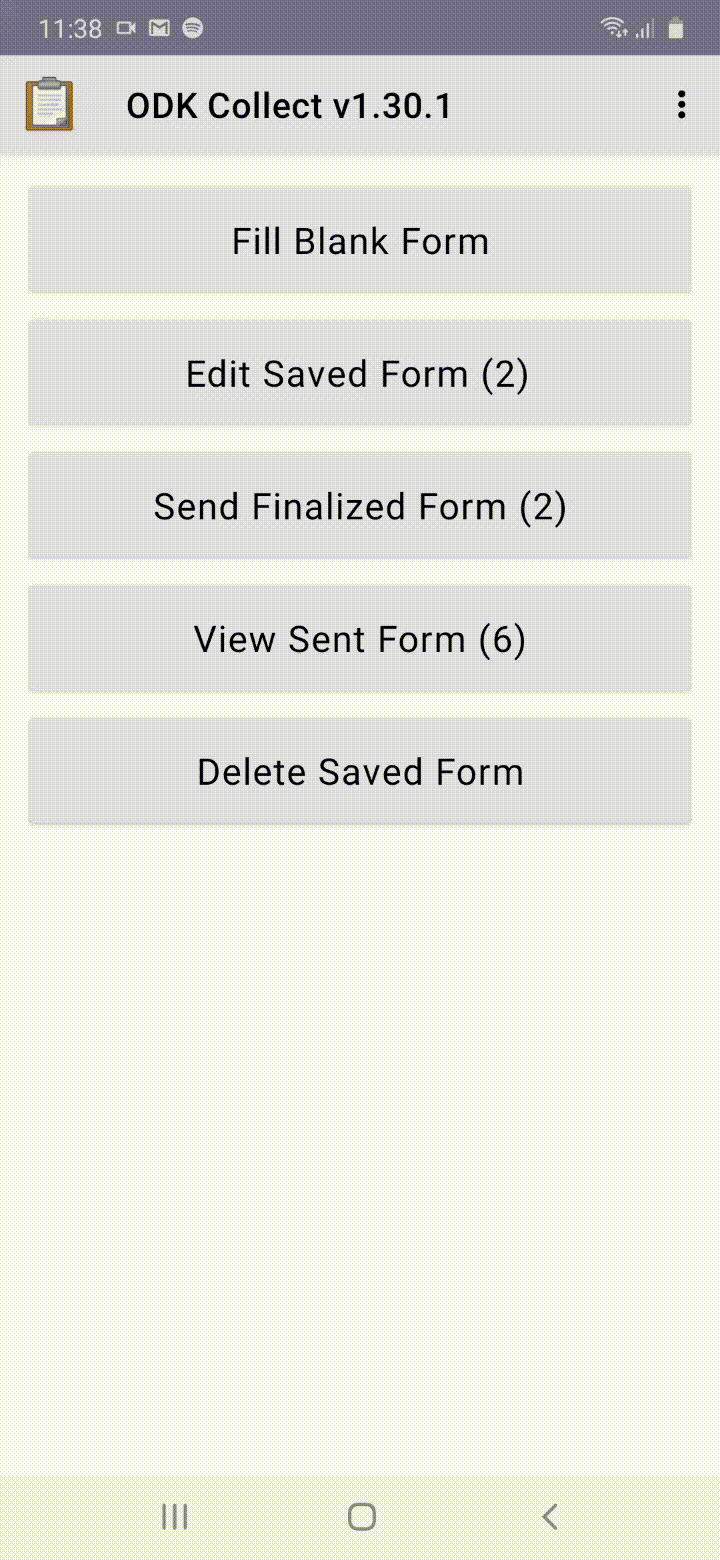
- On the main ODK Collect window, click on ‘Fill Blank Form’, then on the refresh button to get the form updates from the ODK servers. Thereafter, proceed to select your desired form by clicking on it.
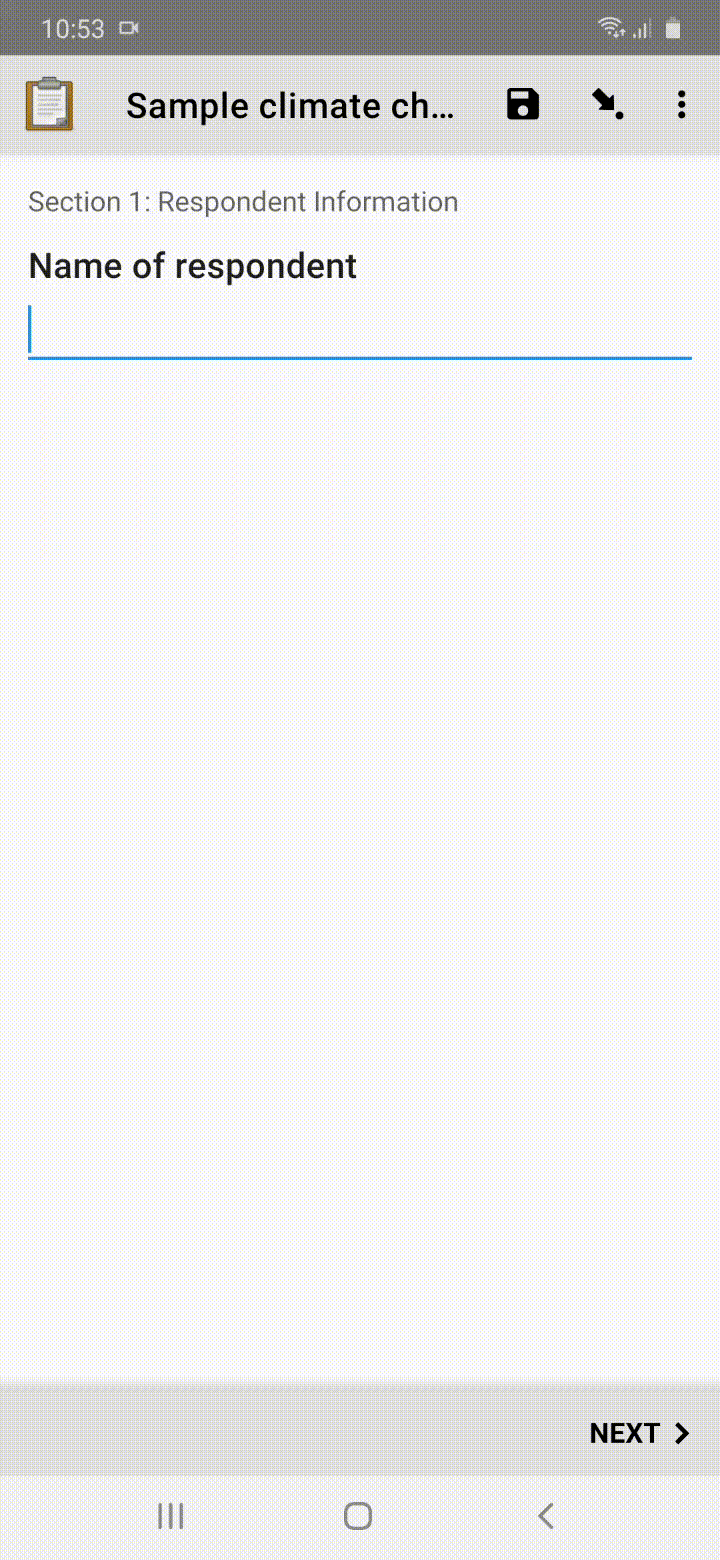
- Your form then opens. Proceed to fill in your survey and click on next to proceed to the next question.
- After finishing the survey, click on ‘Save form and exit’. The form will automatically send to KoBoToolbox if the auto send option on ‘Form Management’ feature was turned on. See earlier instructions for clarity.
Change Language in App
If you want to change language on your survey form on the ODK Collect app:
- Open the survey on the ODK Collect app
- Click on the 3 dots,
- Proceed to click on the option, change language
- Choose the language you want
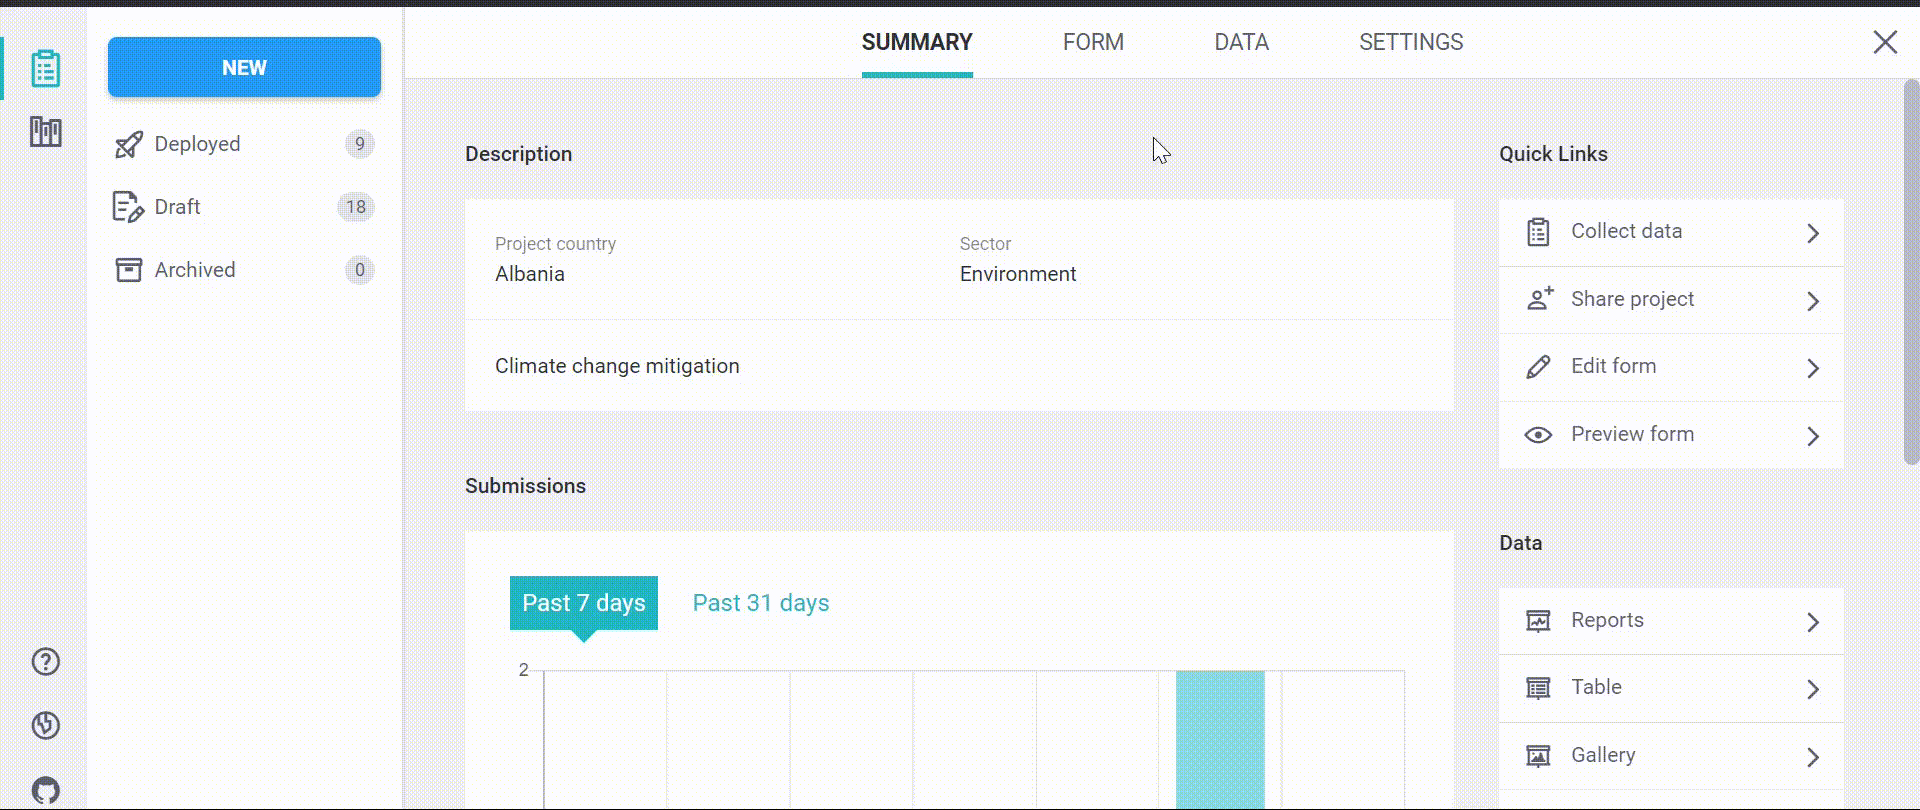
Step 11: After data collection, it’s time to view the data. To do this, go back to your KoBoToolbox survey form, then select the questionnaire of interest.
Tabs on KoBoToolbox
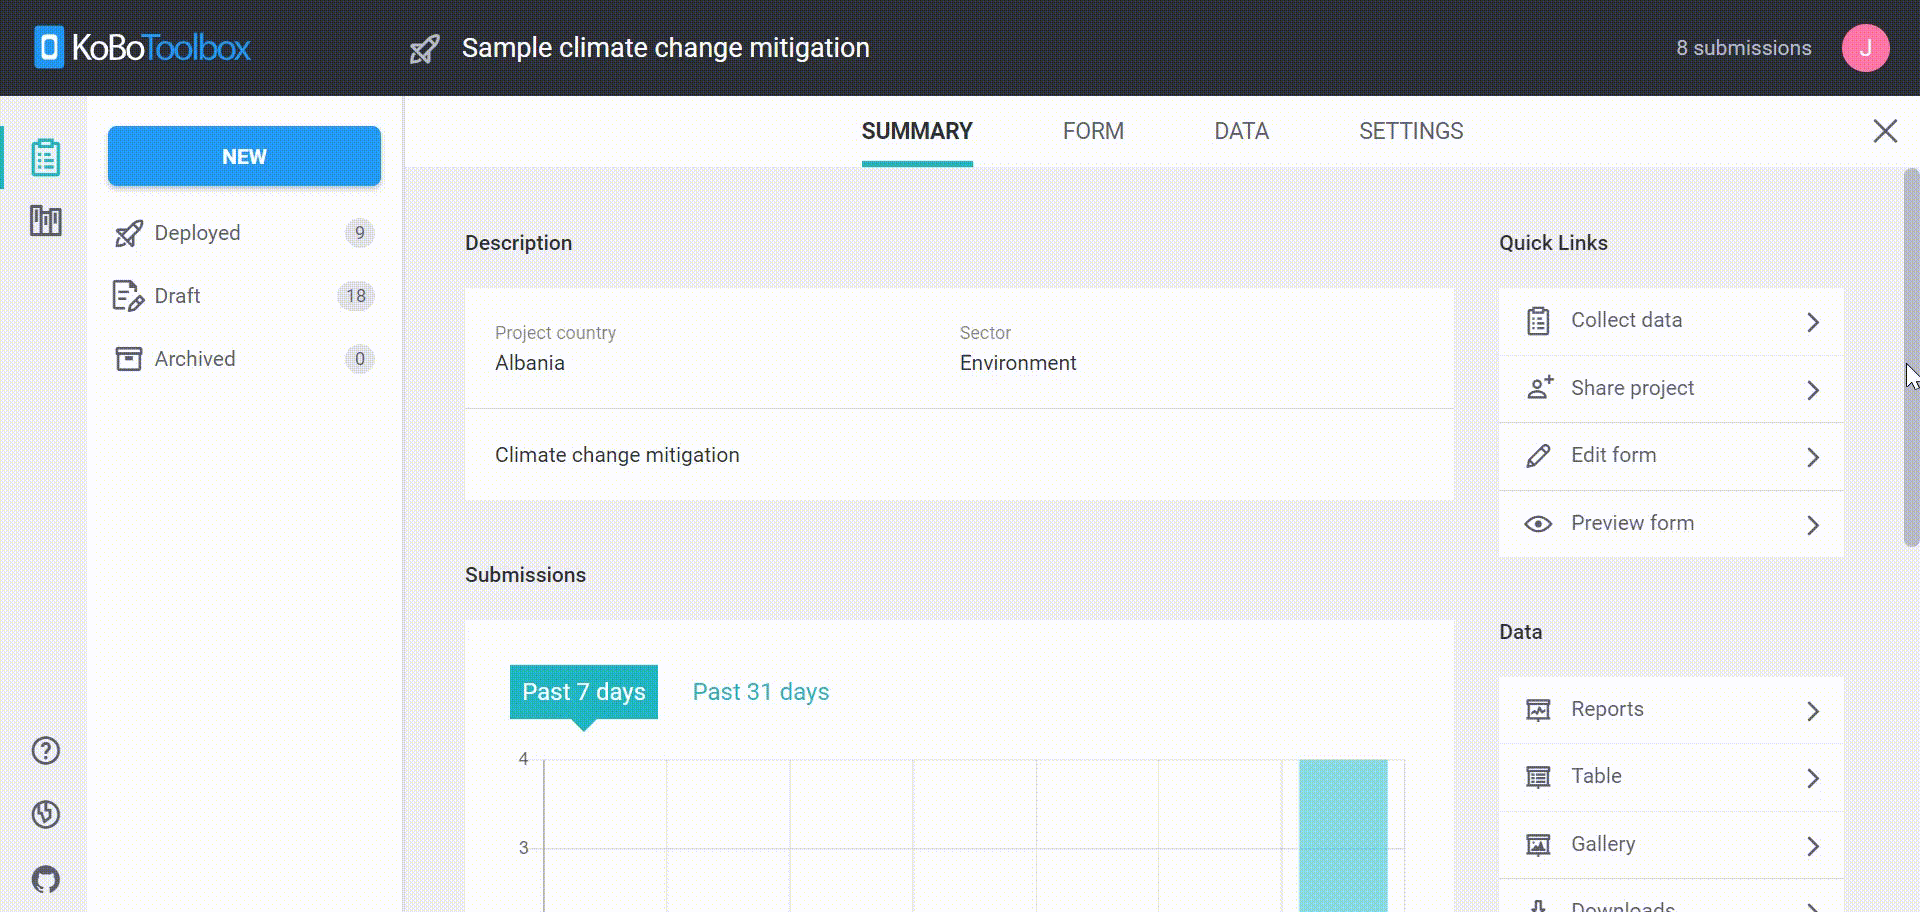
The Summary tab is the default tab, it gives you a summary of the project i.e., project description and the number of submissions. You also have access to quick links (to collect data, share the project, edit and preview the form) and collected data as highlighted below.
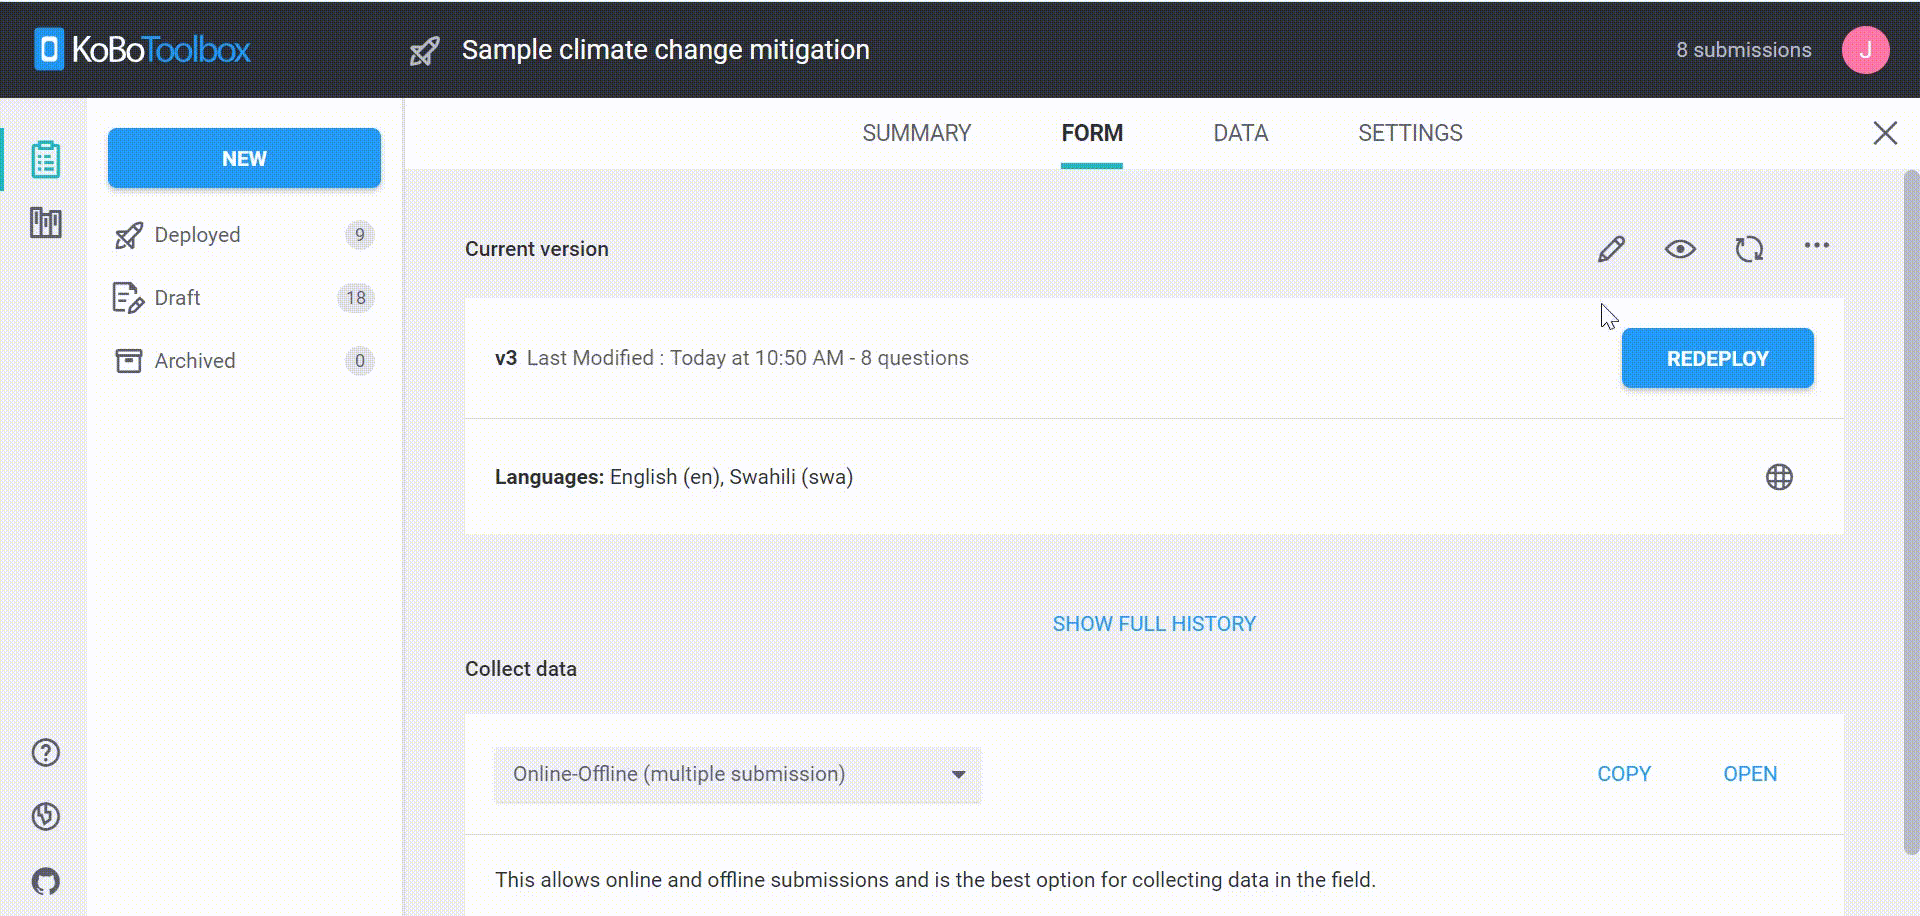
The Form tab allows you perform main functions such as: edit your form, preview, replace, redeploy and manage translations. Other functions of the form tab are downloading xls (for use in MS Excel), downloading xml, sharing the project with other users etc. The form tab also allows you to open the form on Enketo for web submissions (see step 9 for further clarification).
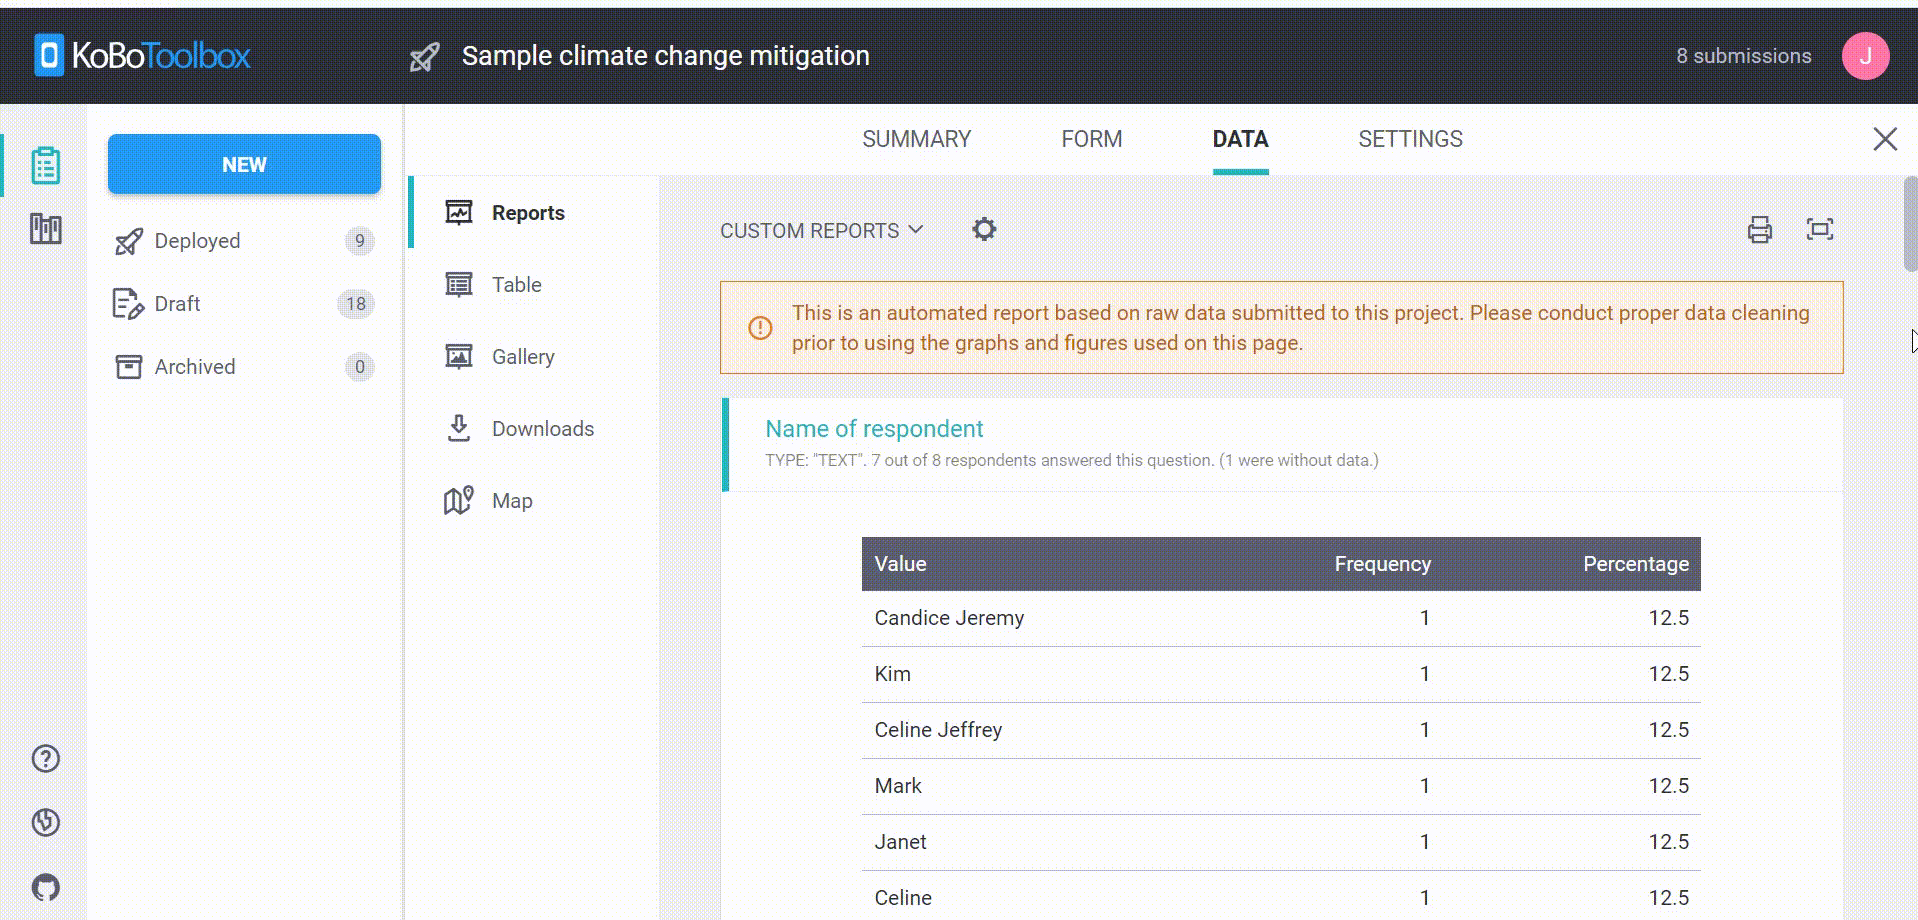
The Data tab is used to view the raw data. Tables and graphs are auto-generated from each form submitted. However, it is advised that you clean the data to get accurate graphs and tables.
The data tab has various options such as:
- Reports– This is the default option. It is where the data is visualised into tables and graphs. You can change some basic parameters like the colours, language, type of graphs and a simple filter/slicer option.
- Tables– This is where you view individual forms, and perform data cleaning by removing redundant forms.
- Gallery– This is where you view the images captioned in the data collection process.
- Downloads– This option allows you to download and export data in various formats e.g. xls, csv, zip, kml etc.
- Map- Allows you to view data collected with a geofield.
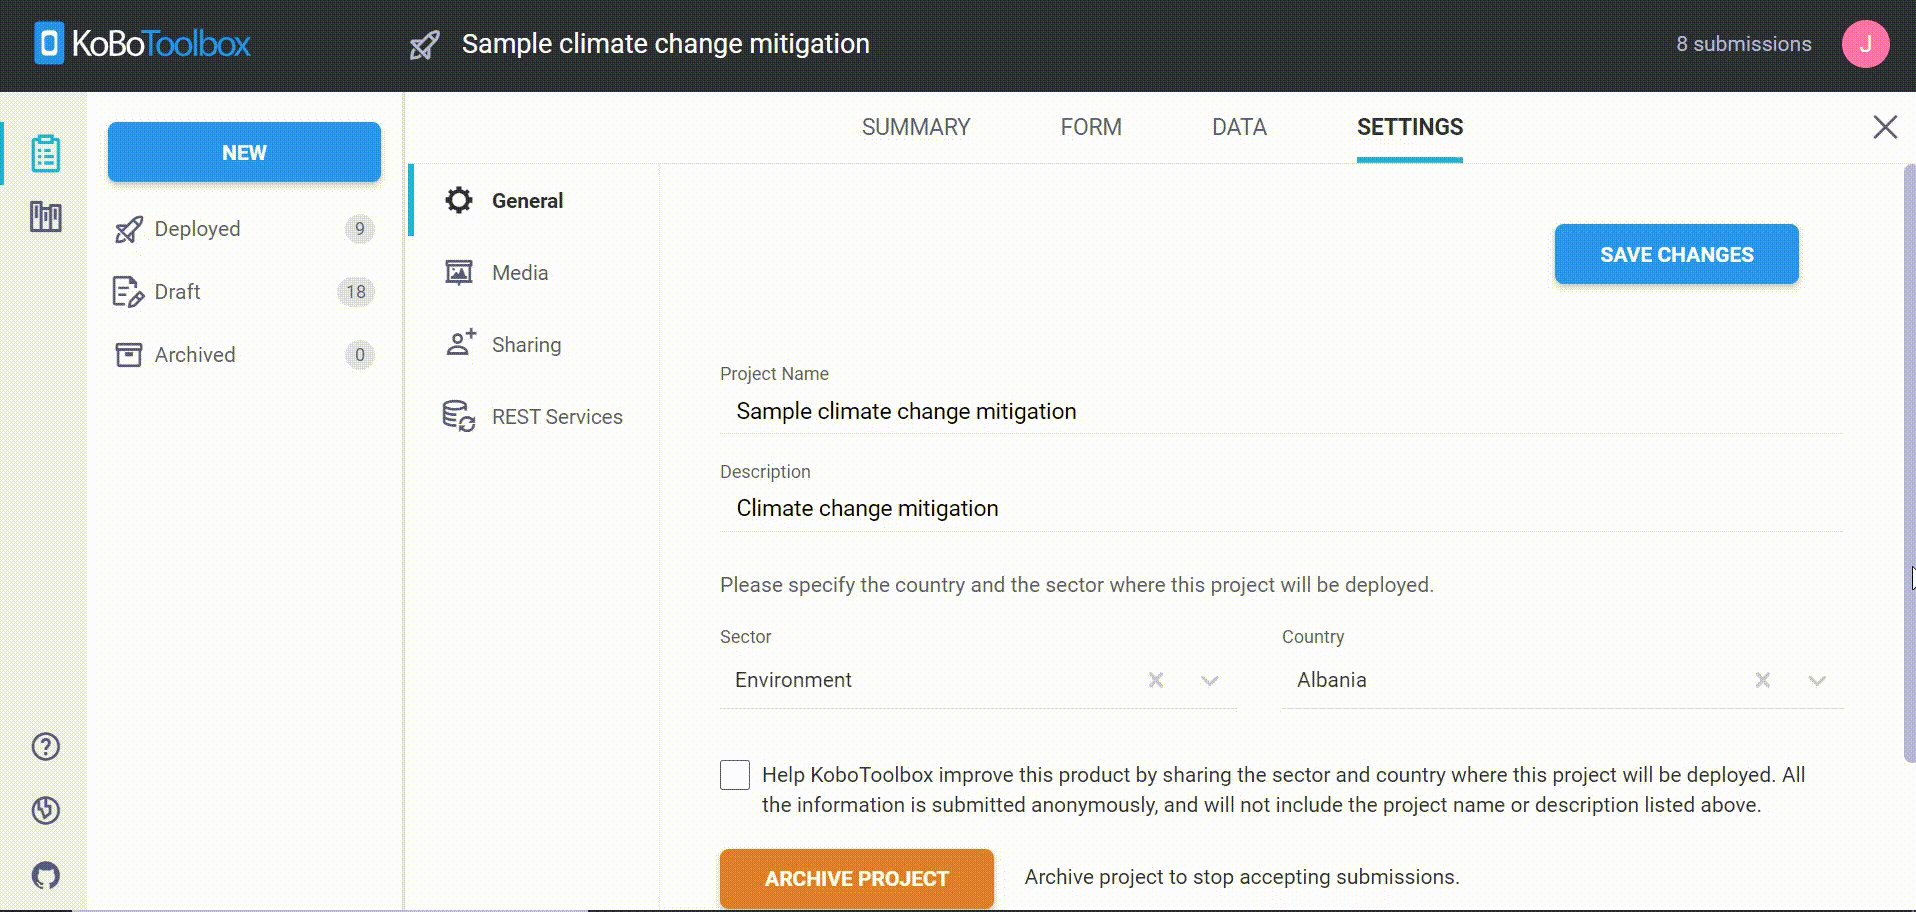
The Settings tab is used to alter the settings of the form. For instance, you can change the project name and description, archive a project to stop accepting submissions as well as delete the project and data altogether.
Thereafter, click on the ![]() button to save your changes.
button to save your changes.
Additional Information:
a. Randomize Answer Options
Randomizing the order of choices in a survey is very important as it reduces enumerator bias on selecting a response for a question. Order of choices can be randomized for any of the select question types.
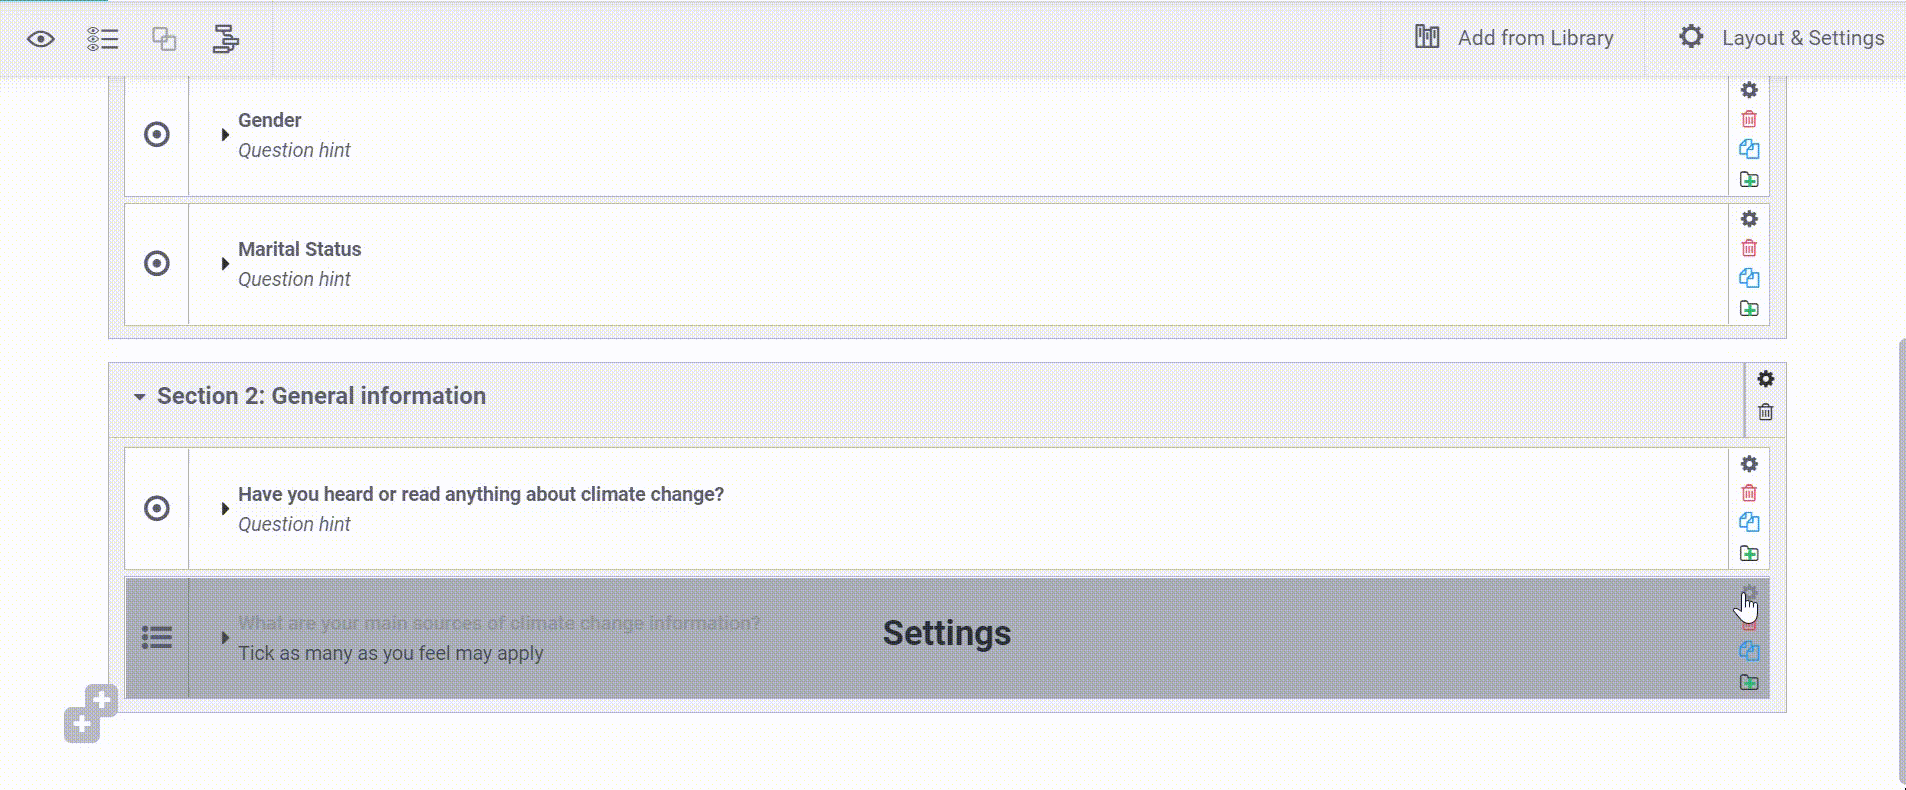
To use this function, click on the settings icon ![]() for individual questions, then go to Question options (its already selected by default). Tick the randomize checkbox, then close the settings window. The close icon appears when you hover your mouse in the region shown below.
for individual questions, then go to Question options (its already selected by default). Tick the randomize checkbox, then close the settings window. The close icon appears when you hover your mouse in the region shown below.
b. The Skip Logic Function
The skip logic function in KoBoToolbox is used to improve data validity. Certain questions on the questionnaire would only appear, if specific conditions are met. To do this:
Click on the settings icon of the desired question, then go over to the skip logic option. Thereafter, click on ![]() button. Input the condition you deem fit, then close the settings window. You can as well manually input a skip logic in XLSForm code by clicking on the
button. Input the condition you deem fit, then close the settings window. You can as well manually input a skip logic in XLSForm code by clicking on the ![]() button. The close icon appears when you hover your mouse in the region shown below.
button. The close icon appears when you hover your mouse in the region shown below.

In the example above, the question, “What are your main sources of climate information?” would only appear if the question, “Have you heard or read anything to do with climate change” is answered “Yes”
c. Validation (Constraints)
This implies that the responses will only be valid if they meet the certain conditions. To use this function, click on the settings icon ![]() for individual questions, then go to ‘Validation criteria’. Input the condition (s) you deem fit. Input an error message. This message pops up on the form if out of range values are input.
for individual questions, then go to ‘Validation criteria’. Input the condition (s) you deem fit. Input an error message. This message pops up on the form if out of range values are input.
If satisfied, close the settings window. The close icon appears when you hover your mouse in the region shown below.
In the example above, the question on ‘age’ will be only valid if the response is less than or equal to (< =) 130. In the case a figure greater than 130 is put, an error message will be sent while filling the form.