HOW WE CAN HELP?
Basics – XLSForm
How to create an XLSForm
This article will explain in great detail how you get started with XLSForm.
What is an XLSForm?
XLSForm is the human-friendly version to create surveys/forms for any OpenDataKit (ODK) based application, such as ODK Central, CommCare, Kobotoolbox, ONA, SurveyCTO or others. It uses Microsoft Excel to develop the survey in a way structured for easy understanding.
Why use XLSForm?
- They are simple to use.
- They allow you to author a form with complex functionalities like skip logic in a consistent way across a number of web and mobile data collection platforms.
- It’s very easy to make changes to the survey form.
A step by step guide.
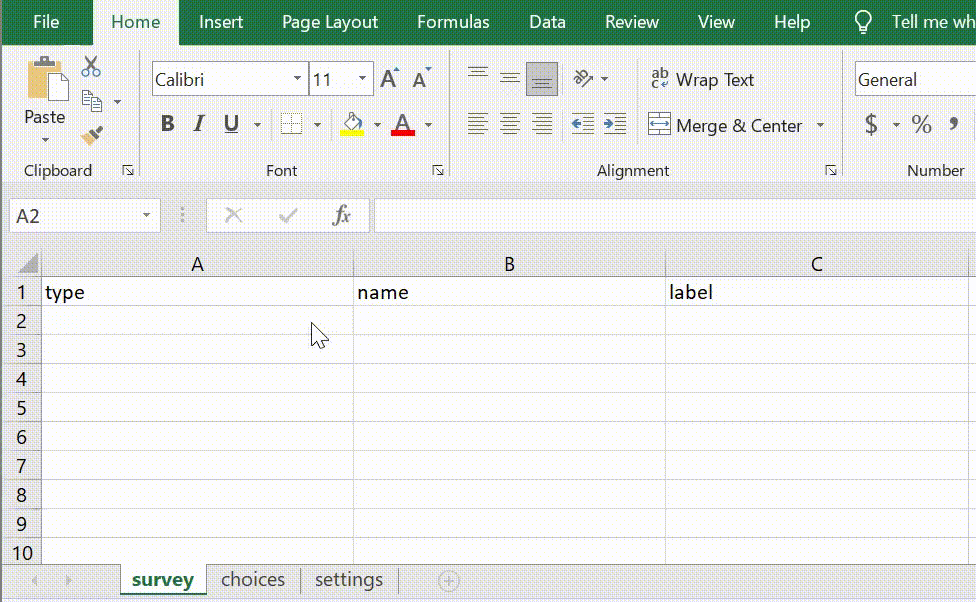
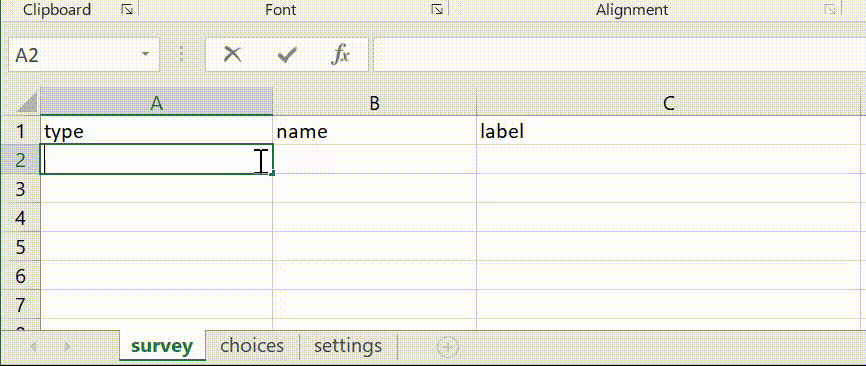
Step 1: Open a new Microsoft Excel workbook.
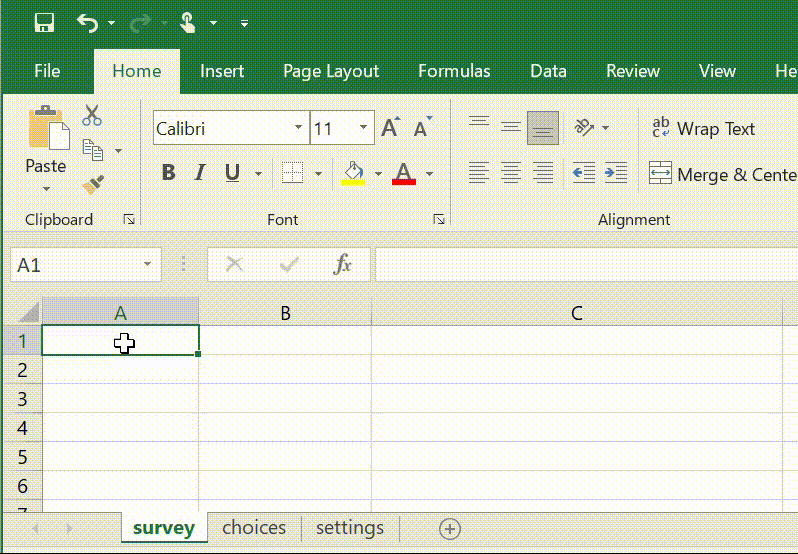
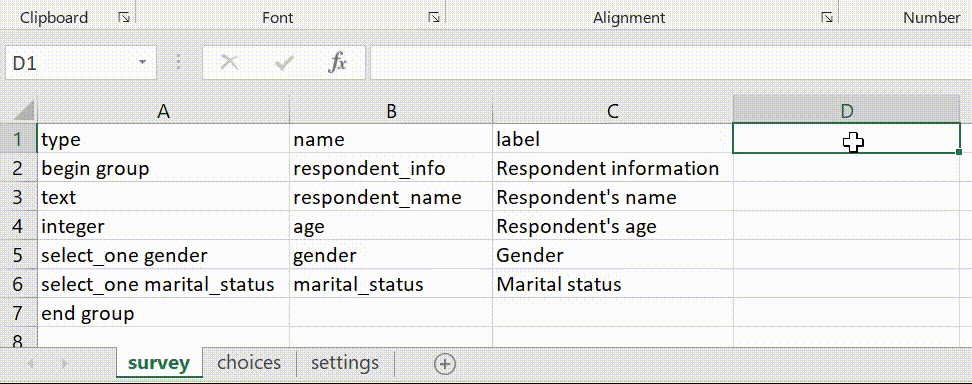
Step 2: Create 2 worksheets; survey and choices. It is very important to keep the spelling and capitalisation exactly as this, otherwise you will have an error later.
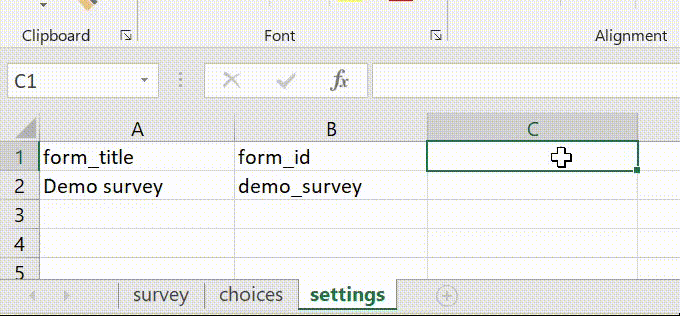
*Note: A third optional worksheet called settings can also be created to add additional specifications to your form i.e., form id, survey name etc

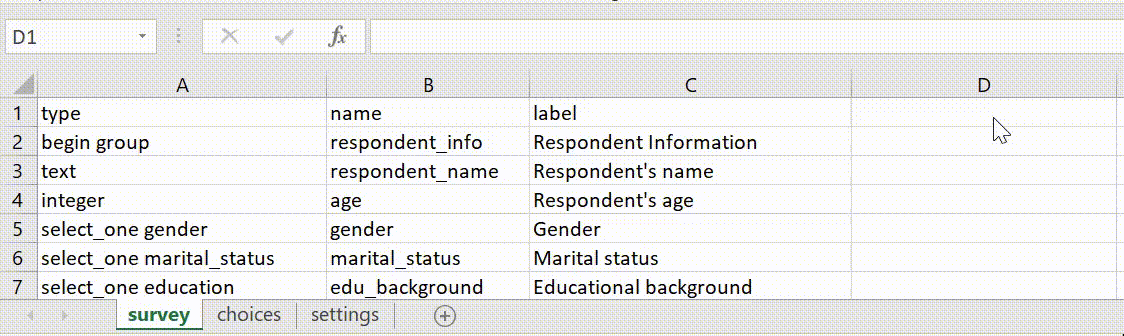
The ‘survey’ worksheet contains the full list of questions, and information about how they should appear in the form. Each row represents one question.
The ‘choices’ worksheet is used to specify the answer choices for multiple choice questions. Each row represents one answer option.
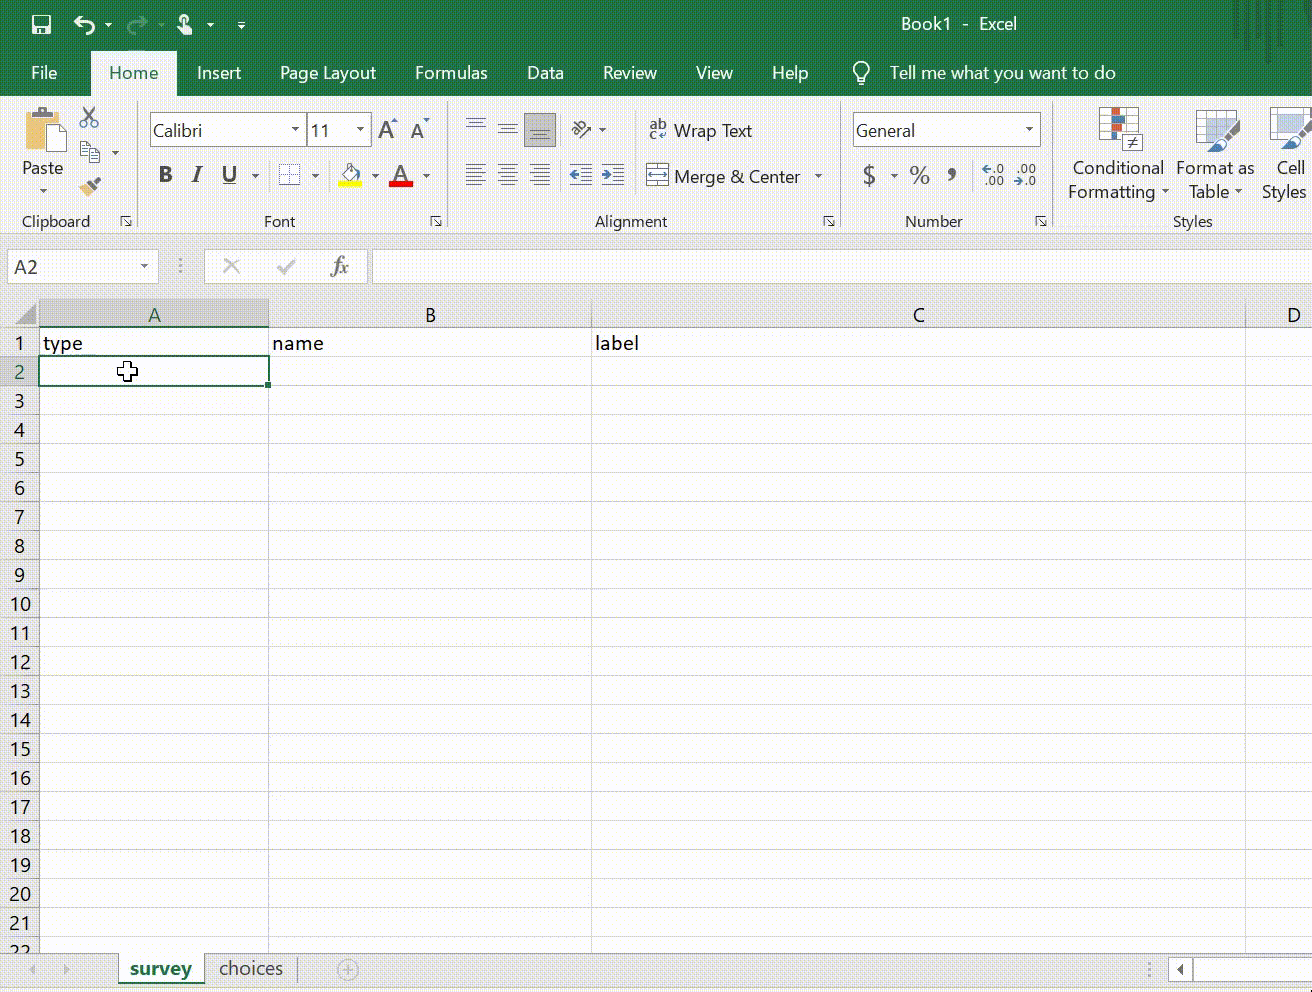
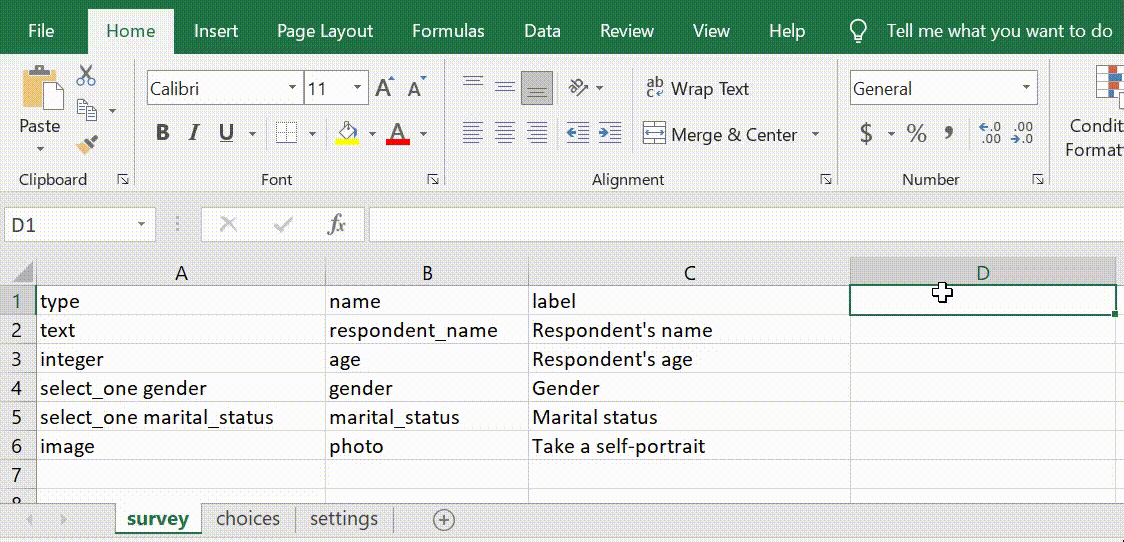
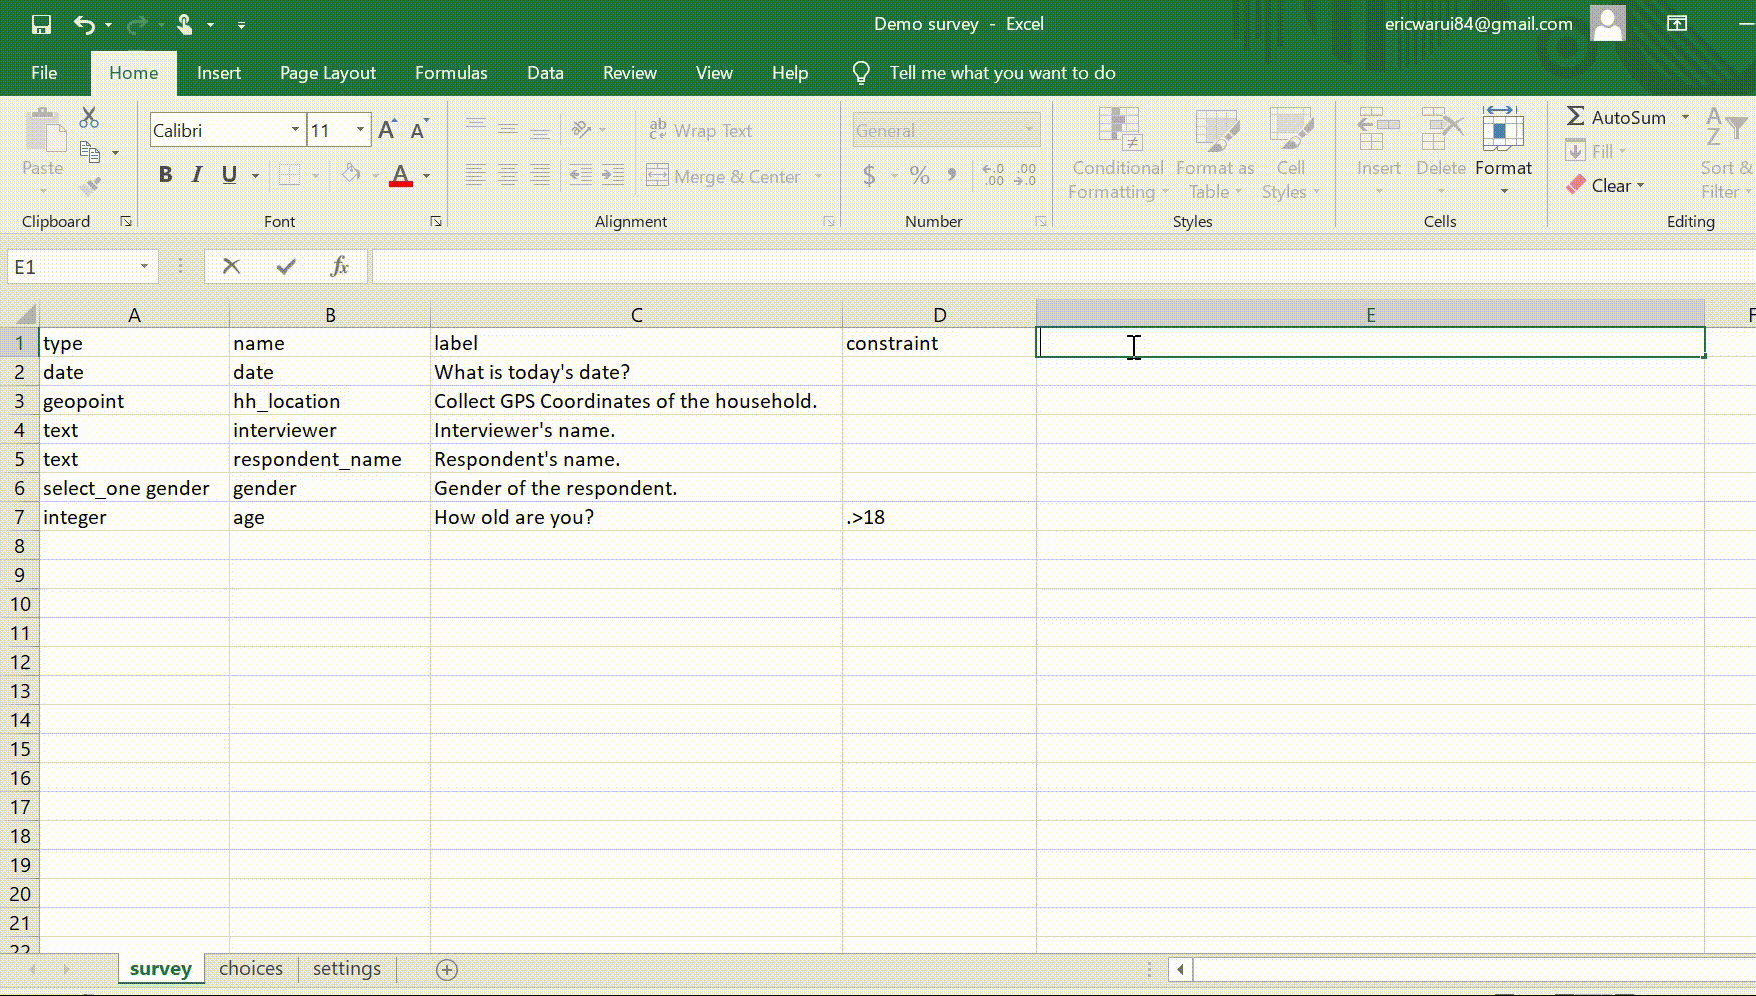
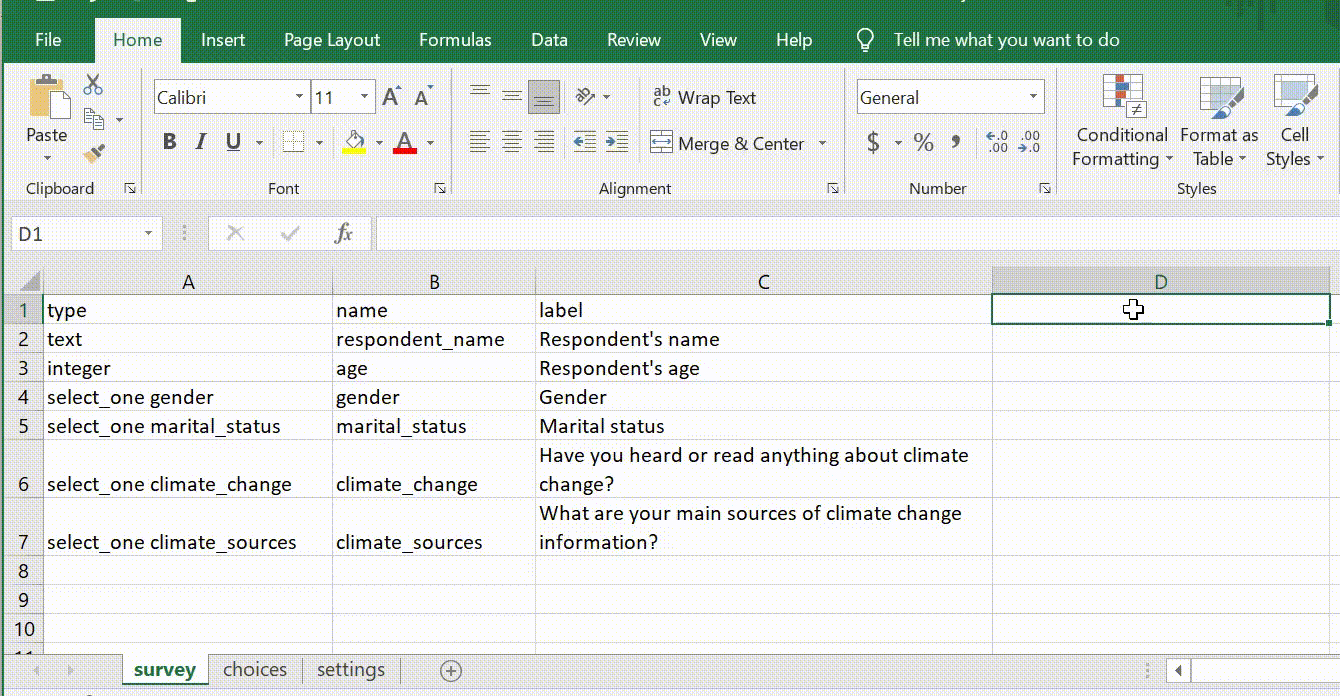
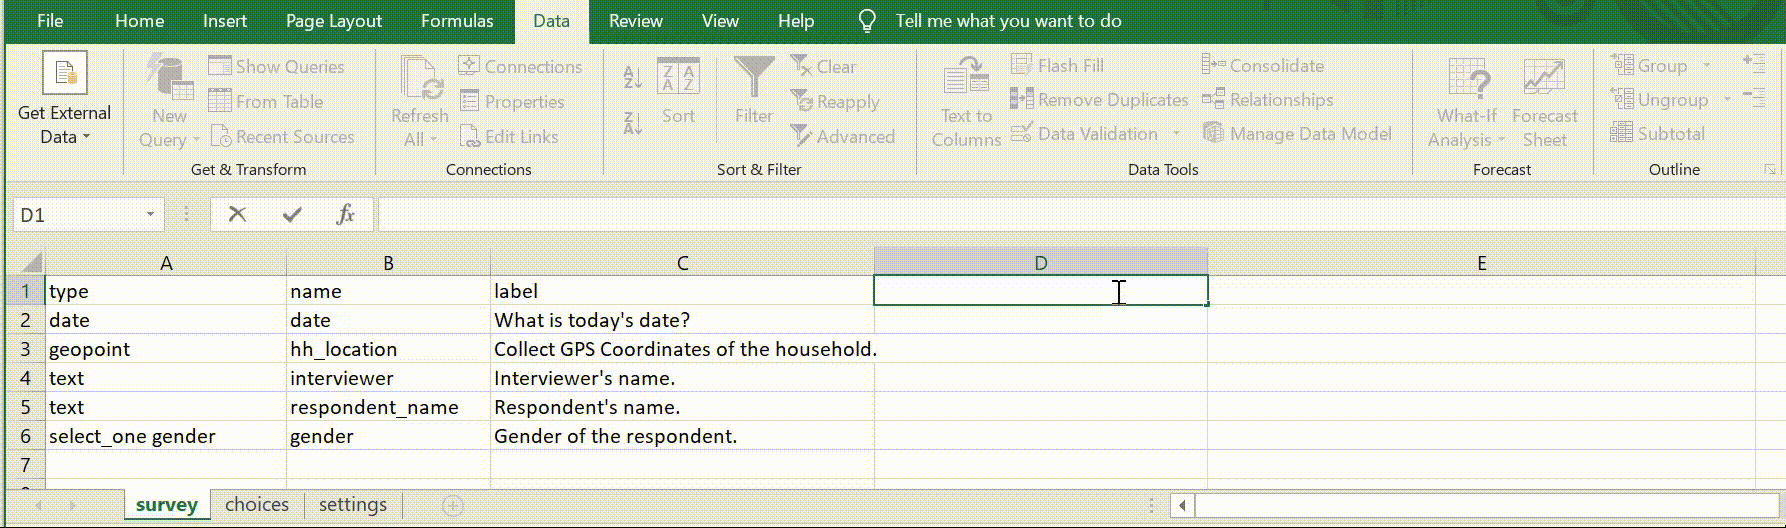
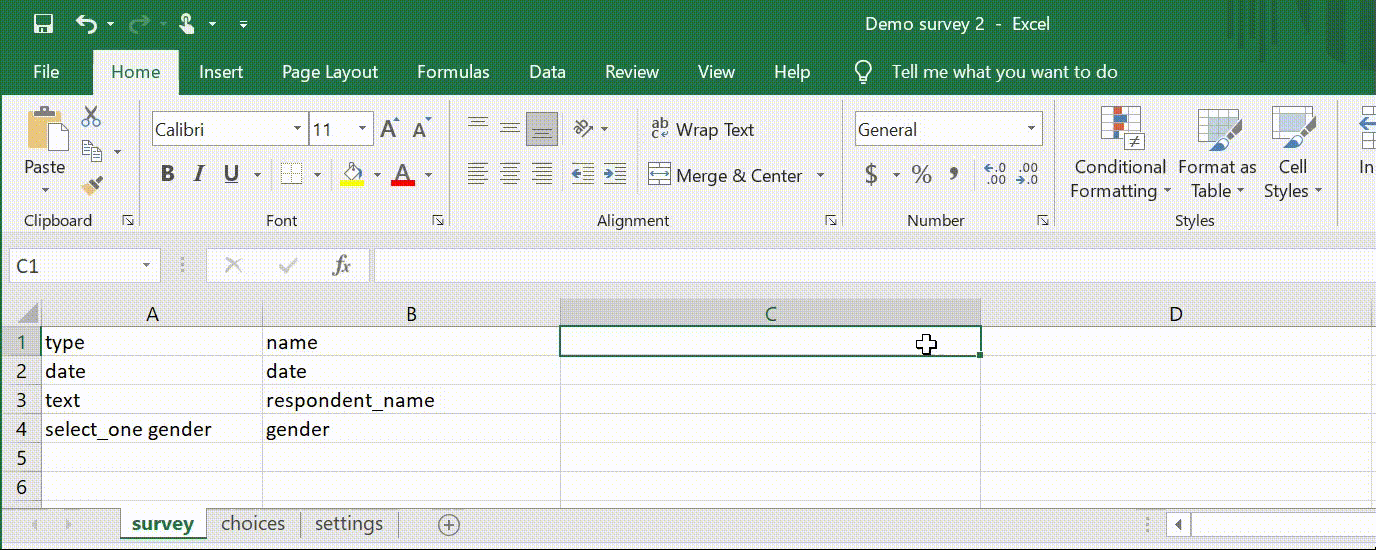
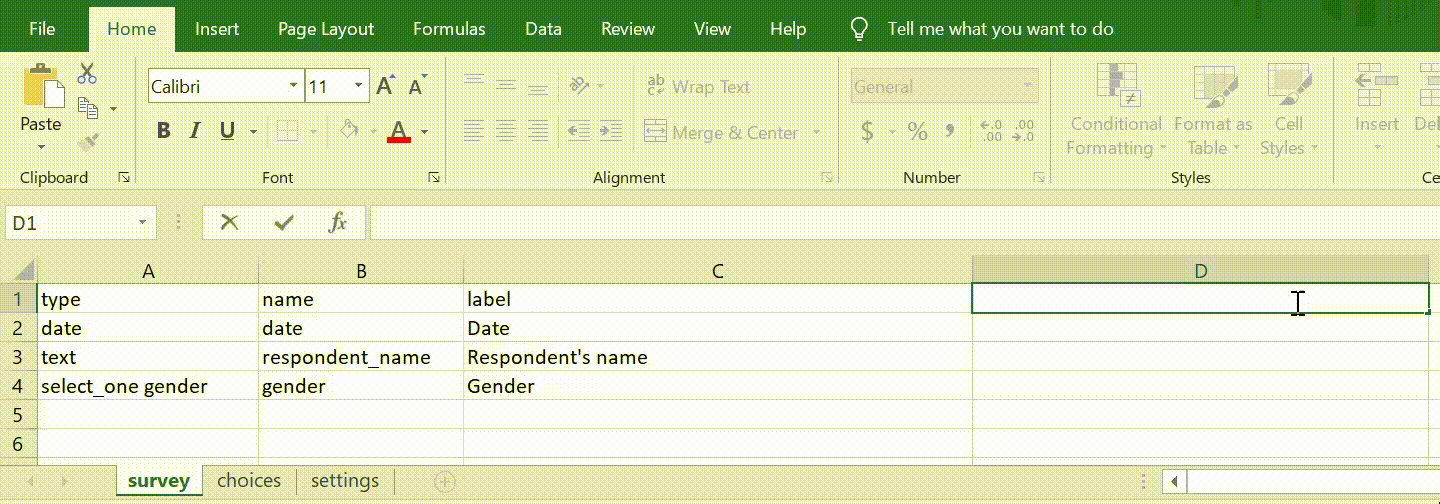
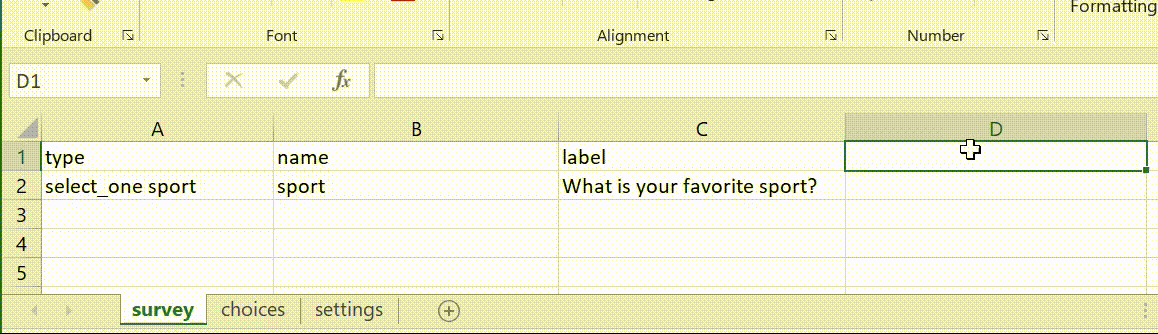
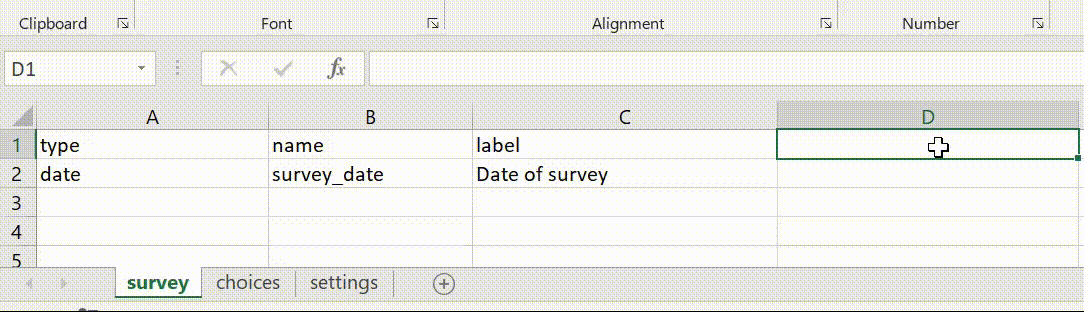
Step 3: On the survey worksheet, create 3 columns; type, name, and label.
*Note: These are the mandatory columns, you can have more as needed. The order of the column does not matter, this is how we find easiest.
- The type column specifies the question type.
- The name column specifies the unique variable name for the question.
*Note: No two entries can have the same name. Names have to start with a letter or an underscore. Names can only contain letters, digits, hyphens, underscores, and periods. Names are case-sensitive.
- The label column contains the actual text displayed to the form user.
Question Types
These options are entered in the type column (A) of the survey worksheet.
| Question type | Answer input |
|---|---|
| select_one [list name] | Multiple choice question; only one answer can be selected. |
| select_many [list name] | Multiple choice question; multiple answers can be selected |
| select_one_from_file [file] | Multiple choice from file; only one answer can be selected |
| select_multiple_from_file [file] | Multiple choice from file; multiple answers can be selected. |
| text | Free text response e.g., name |
| integer | Integer (i.e., whole number) input. (max 9 digits). |
| decimal | Decimal input. |
| date | Date input. |
| dateTime | Accepts a date and a time input |
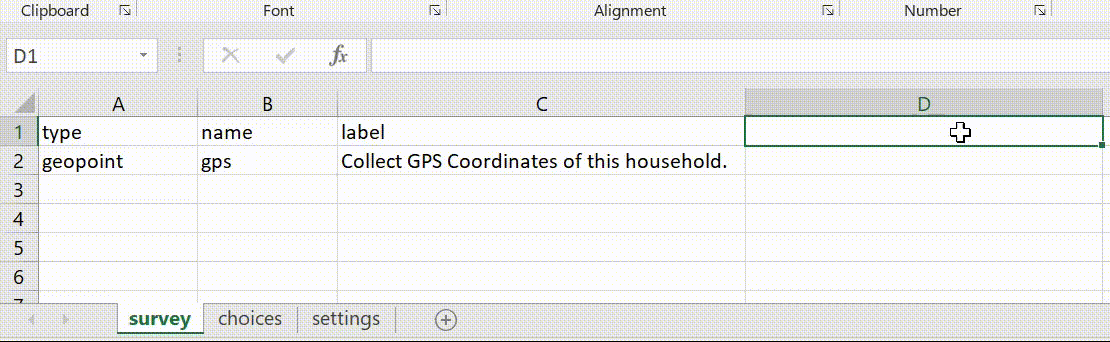
| geopoint | Collect a single GPS coordinate. |
| geotrace | Geotrace. Record a line of two or more GPS coordinates |
| geoshape | Record a polygon of multiple GPS coordinates; the last point is the same as the first point. |
| image | Take or upload a picture (image). |
| audio | Take an audio recording. |
| video | Take a video recording. |
| note | Display a note on the screen, takes no input. |
| barcode | Scan a barcode/QR Code; requires the barcode scanner app to be installed. |
| acknowledge | Acknowledge prompt that sets value to “OK” if selected. |
| range | Range input (including rating) |
| Rank [list name] | Creates a ranking; order a list |
| calculate | Perform a calculation. Calculate questions are not displayed on your form, but they are executed automatically as your form is being answered |
| hidden | Hide questions |
| file | Upload a file (txt, pdf, xls, xlsx, doc, docx, rtf, zip) |
| xml-external | Adds a reference to an external XML data file |
This is how it looks in your XLSForm:
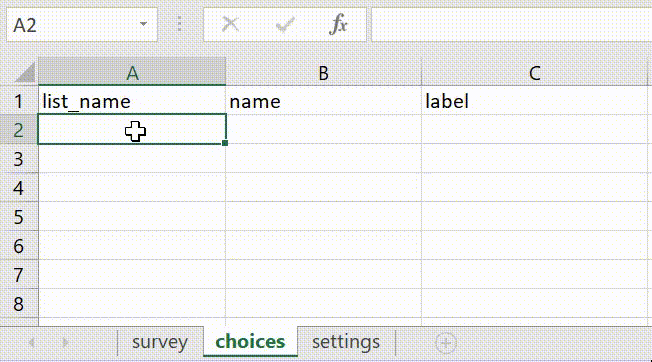
Step 4: On the choice worksheet, type out 3 columns; list_name, name, and label.
- The list_name column lets you group together a set of related answer choices, i.e., answer choices that should appear together under a question.
- The name column specifies the unique variable name for that answer choice. The same rules apply as for the name column in the survey sheet.
- The label column shows the answer choice exactly as you want it to appear on the form. Alternatively, label translation columns can be used (see multilanguage support further on in the document).
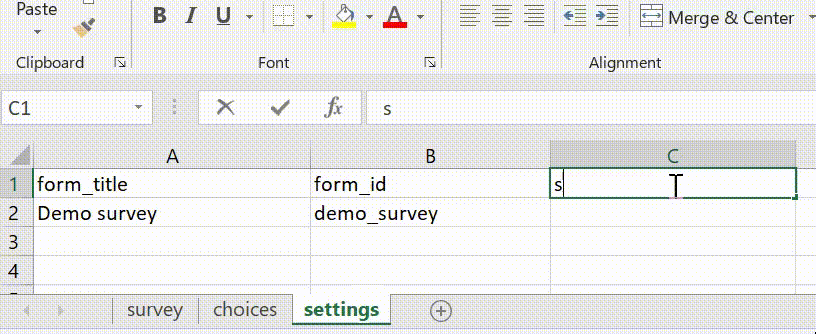
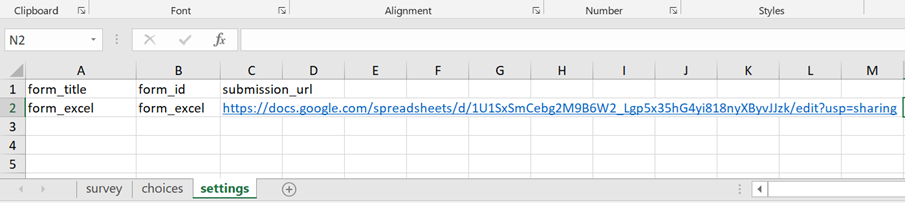
Step 6 (optional): Create the settings worksheet. It allows you to further customise your form, for instance by adding the form title, form id, alternative submission URL etc.

The column headings in this example do the following:
- form_title: The title of the form that is shown to users. The form title is pulled from form_id, if form_title is blank or missing.
- form_id: The name used to uniquely identify the form on the server. The form id is pulled from the XLS file name if form_id is blank or missing.
- public_key: For encryption-enabled forms, this is where the public key is copied and pasted.
- submission_url: This url can be used to override the default server where finalized records are submitted to.
Note: The submission url should only be used if you are familiar with it, otherwise, you may run into trouble later if something goes wrong here (you can download your forms, but not upload).
- default_language: In localised forms, this sets which language should be used as the default. The same format as described for adding translations should be used, including the language code.
- version: String of up to 10 numbers that describes this revision. Revised form definitions must have numerically greater versions than previous ones. A common convention is to use strings of the form ‘yyyymmddrr’. For example, 2021021501 translates to the 1st revision from Feb 15th, 2021.
Step 7: To test the form, you can upload it in your respective account of any of the applications that we mentioned above. We will use a way here, where you do not need to have an account and can directly test it.
To view the form in Enketo (web-based form user that is ODK-friendly), go to GetODK and upload your form. It will also transform the XLSForm file into a XForm file (but that is not important right now). If you have errors in your file, it will tell you where and what. You won’t be able to complete the upload of a form with error, and thus cannot view it either.

Alternatively, you can as well opt to upload the XLSForm on KoboToolbox (for example), then deploy it from there for data collection.
To do this:
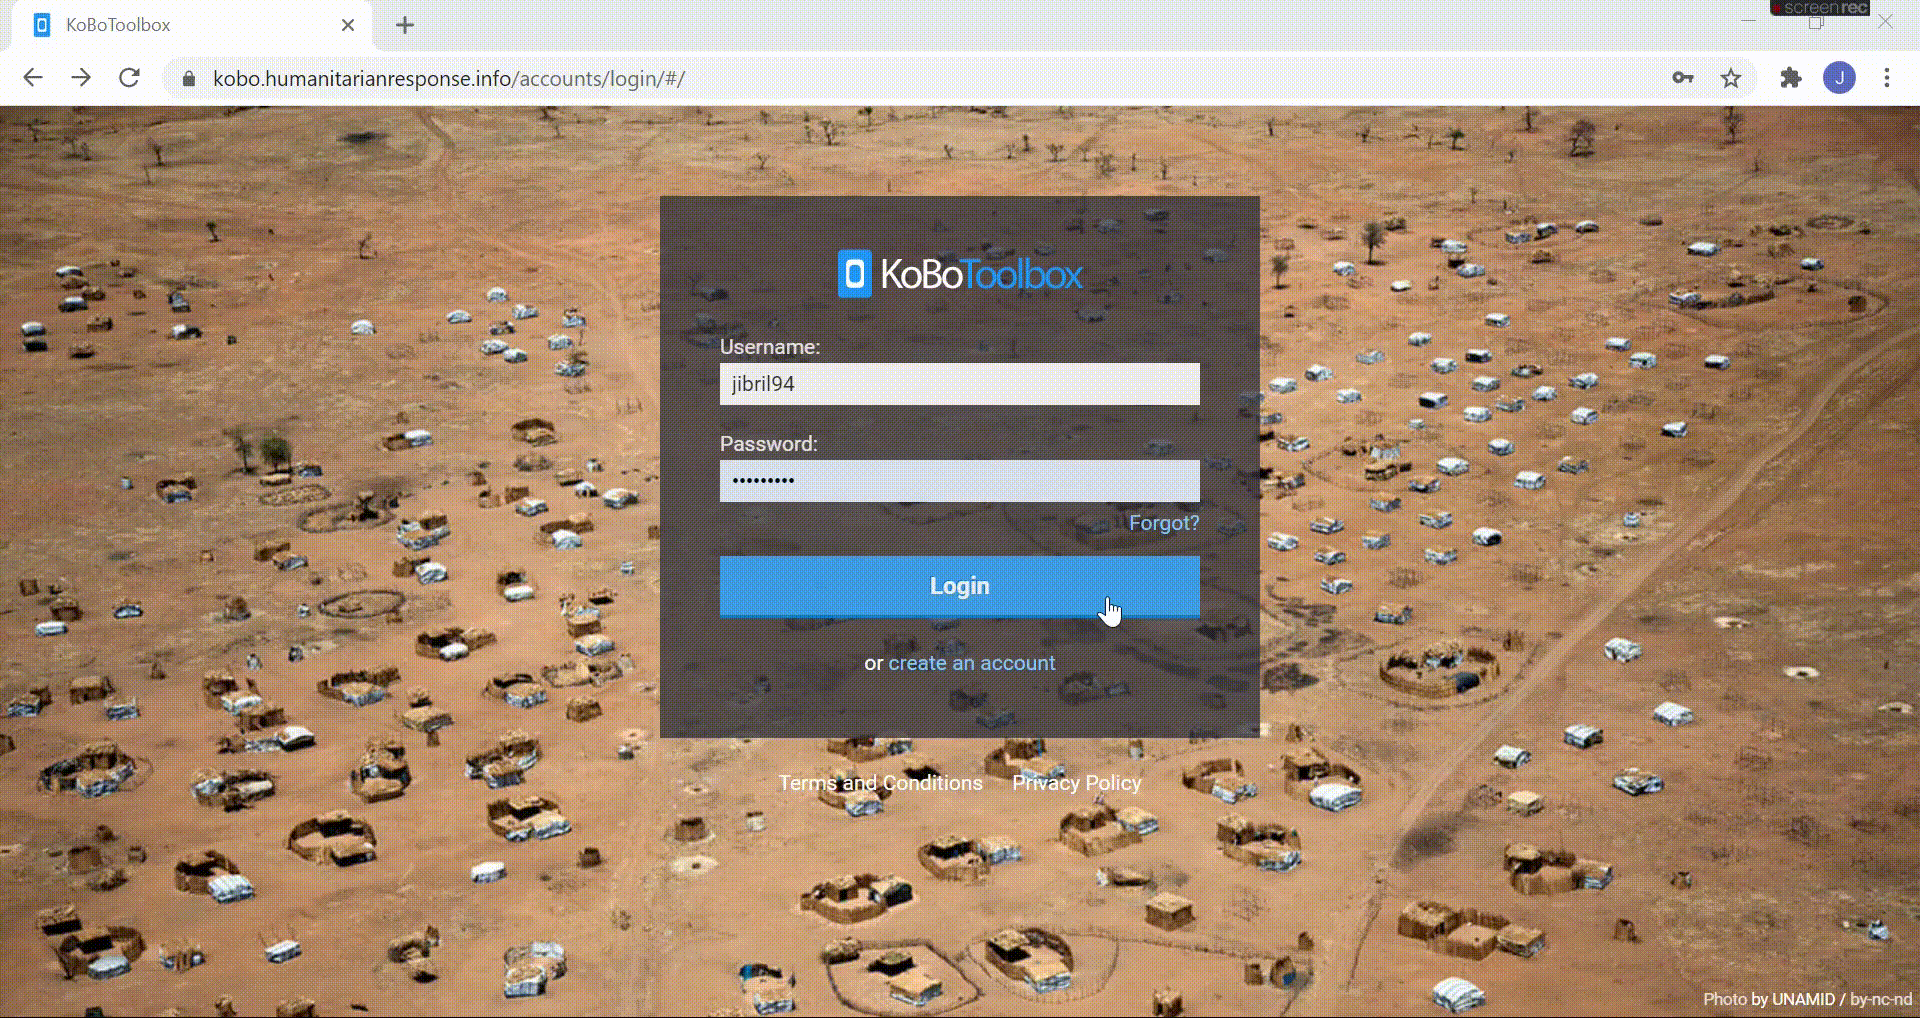
- Visit the website for your Kobotoolbox account (humanitarian or researcher or your self-hosted one).
- If you do not have an account, but would like to, head here to register (sign-up from the top right menu).
- Click on new to create a new form
- Choose a source, ‘upload an XLSForm’
- A window pops up, prompting you either to drag and drop the XLSForm, or browse for its location on your computer.
- After the form has been uploaded, another window opens up prompting you to create a project.
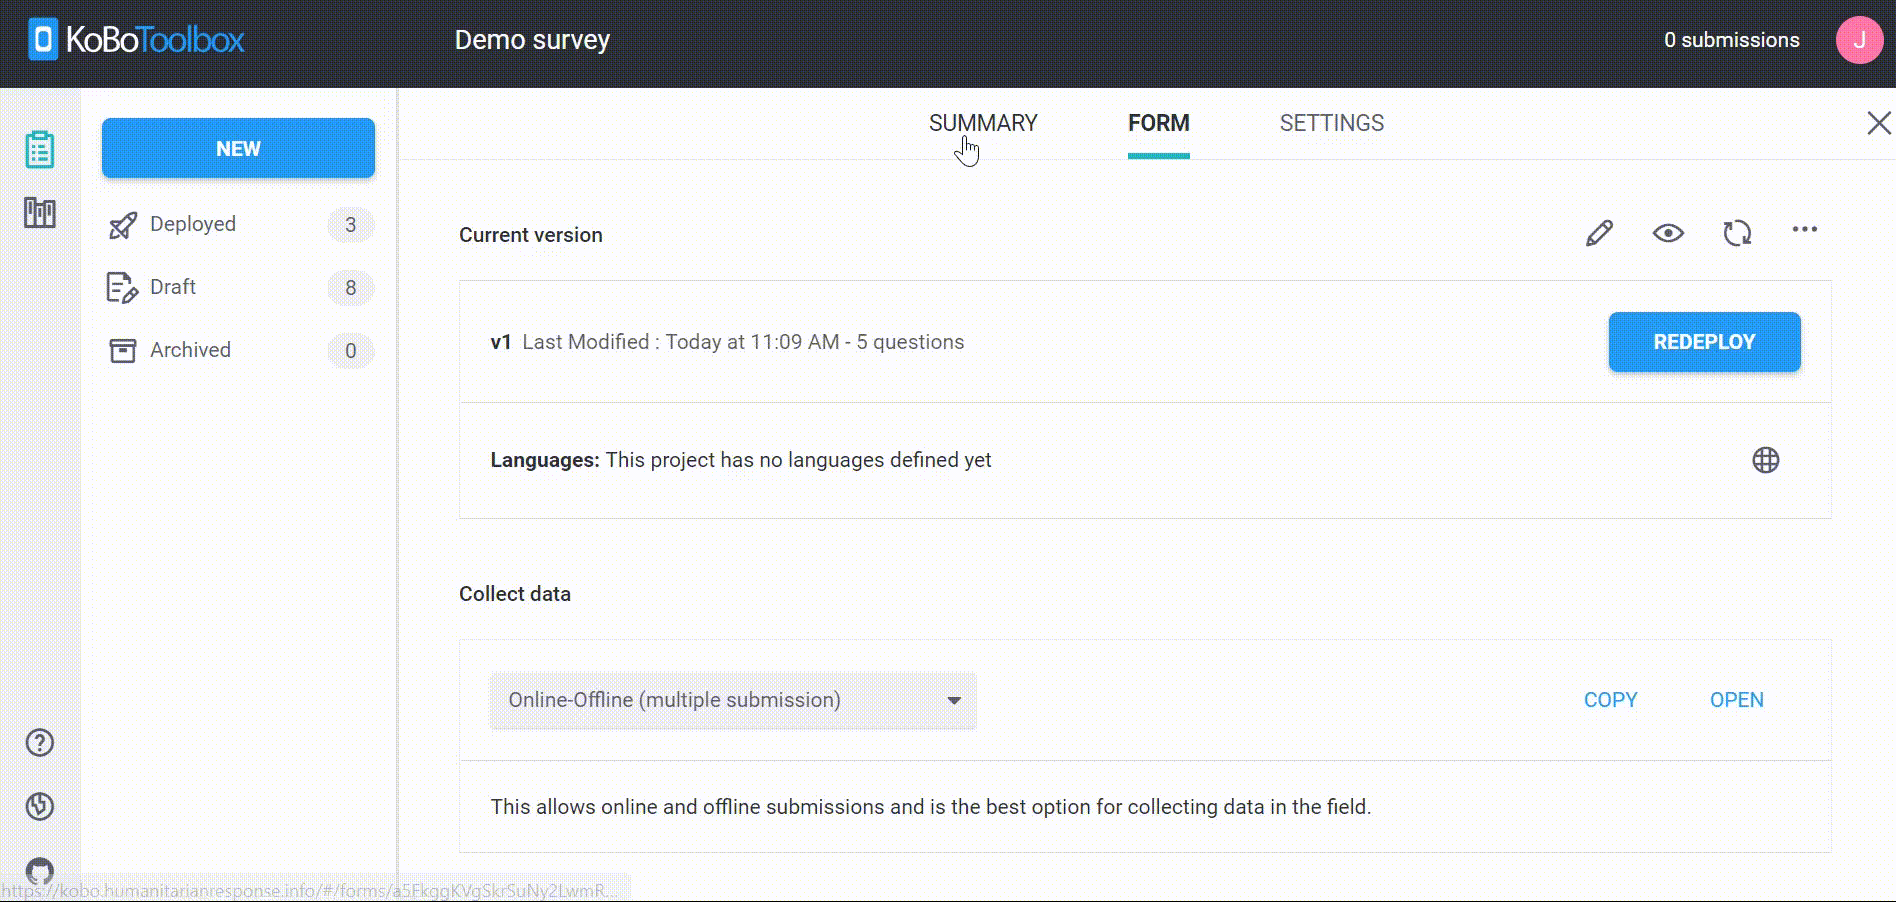
- Preview the form as shown in the illustration below, then deploy it for data collection as shown below.
To view the form submissions, go to settings tab, then to reports. See the illustration below (click to open a new tab with the video).
Additional Information
It is possible to include other features on the survey worksheet to create complex functionalities on the survey form. It can be done by adding columns such as constraints, hints, formulas, calculations and relevance etc.
1. Hints
Hints are used to add additional information, or instructions to the user.
Step 1: Open the survey worksheet.
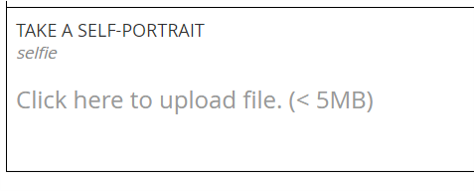
Step 2: Add a hint column after label, then type out the corresponding hint message.
The hint message, selfie, would appear on the survey form as shown below.
2. Constraints
Constraints are added to the survey form to ensure data quality.
Step 1: Open the survey worksheet.
Step 2: Add a constraint column after label, then type out your question and the corresponding constraint.
Click on the below picture to see the video of how to do it (new tab will open):
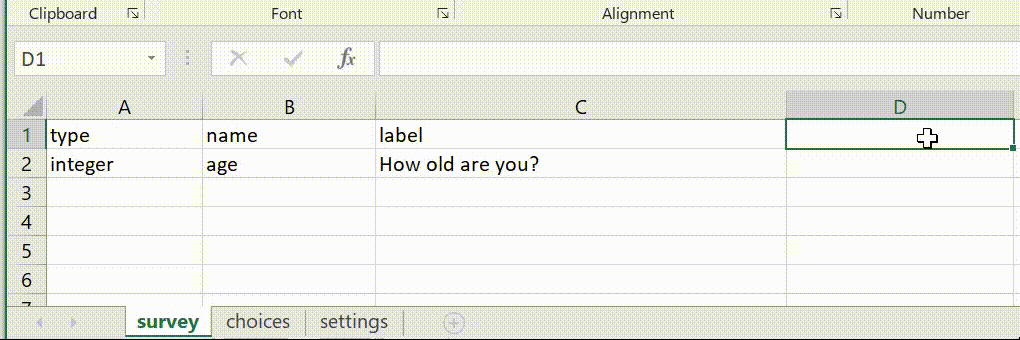
*Note: In this example, the age of the respondent would only be valid if it was less than or equal to 150. The dot (.) in the formula (.<=150) refers back to the question variable, this means the entry the user makes.
You may opt to include a constraint message telling the use why their response was rejected. Simply add another column after constraint, then label it constraint_ message. Type out your constraint message in the column.
Click on the below picture to see the video of how to do it (new tab will open):
In the example above, the constraint message would only appear if values less than 18 were input, and the survey would not proceed.
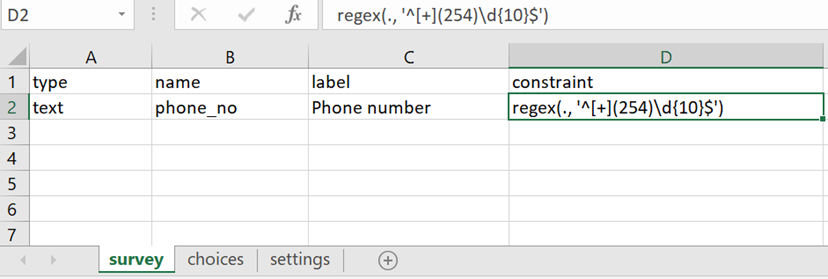
Regex
Regex means regular expressions. It is a sequence of characters that specifies a search pattern. For instance, in the screenshot below, the regex used is meant to restrict a text entry to numbers only (as the integer question type only allows up to 9 digits). The regex (., ‘^[+](90)\d{10}$’) requires the entry to be a numerical value starting with +254 and then 10 digits (a phone number in Kenya).
Constraint based on previous responses
Responses from previous questions can be used to restrict responses in the subsequent questions.

In the example above the syntax used is .<${oldest} implying that the age of the youngest child has to be smaller than the age of the oldest child.
Note: This example of course only works if a family has a least two children.
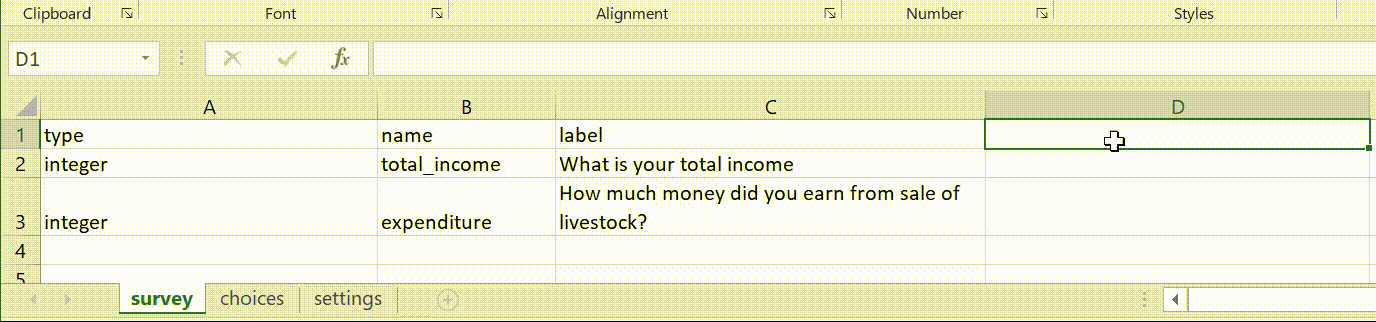
Constraint based on previous calculations
A great way to use constraints to improve the quality of your data is to constrain responses based on previous calculations. For example, in the beginning of your survey you might ask for a respondent’s total income (using a field called total_income).
Later in the survey, you could constrain questions about individual income streams (e.g., “How much did you earn just from X?”) using the answer given at the beginning. The amount earned from an individual income stream should always be less than or equal to their total income: .<= ${total_income}
Constraint on multiple choice responses
It is possible to restrict the number of responses to multiple choice questions by adding a syntax in the related constraint column
In this example, the number of responses has been restricted to a maximum of 3 using the syntax, count-selected(.)<=3
Constraint on multiple choice responses (none of the above)
It is possible to restrict multiple choice responses in the sense that the option “none of the above” cannot be selected alongside other options. To do this a relevant syntax has be introduced, and perhaps a constraint message.

In the question above the syntax not(selected(., ‘5’) and (selected (., ‘4’) or selected (., ‘3’) or selected (., ‘2’) or selected (., ‘1’))) has been used to mean that the option ‘none of the above’ represented by the variable name ‘5’ cannot be selected alongside other option.
3. Relevant
This is a very important feature in XLSForms that makes it possible to skip a question, or make certain questions appear based on the response to a previous question (skip logic function).
Step 1: Add a relevant column on the survey worksheet.
Step 2: Type out your formula in the relevant column.
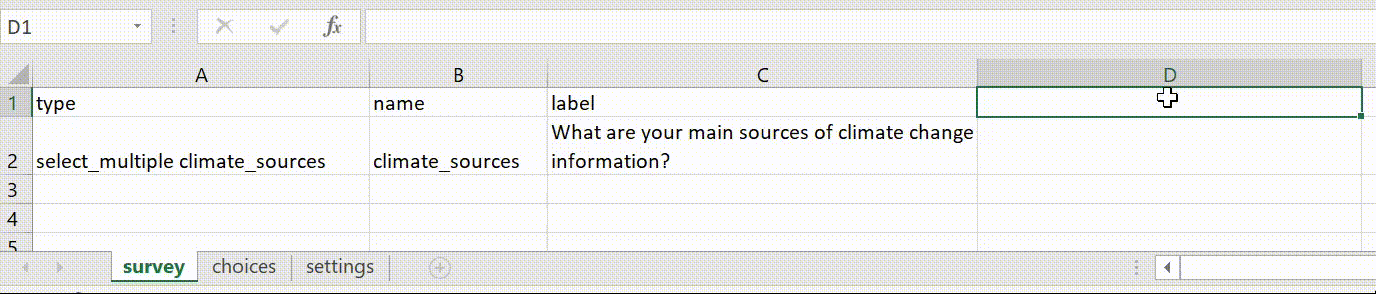
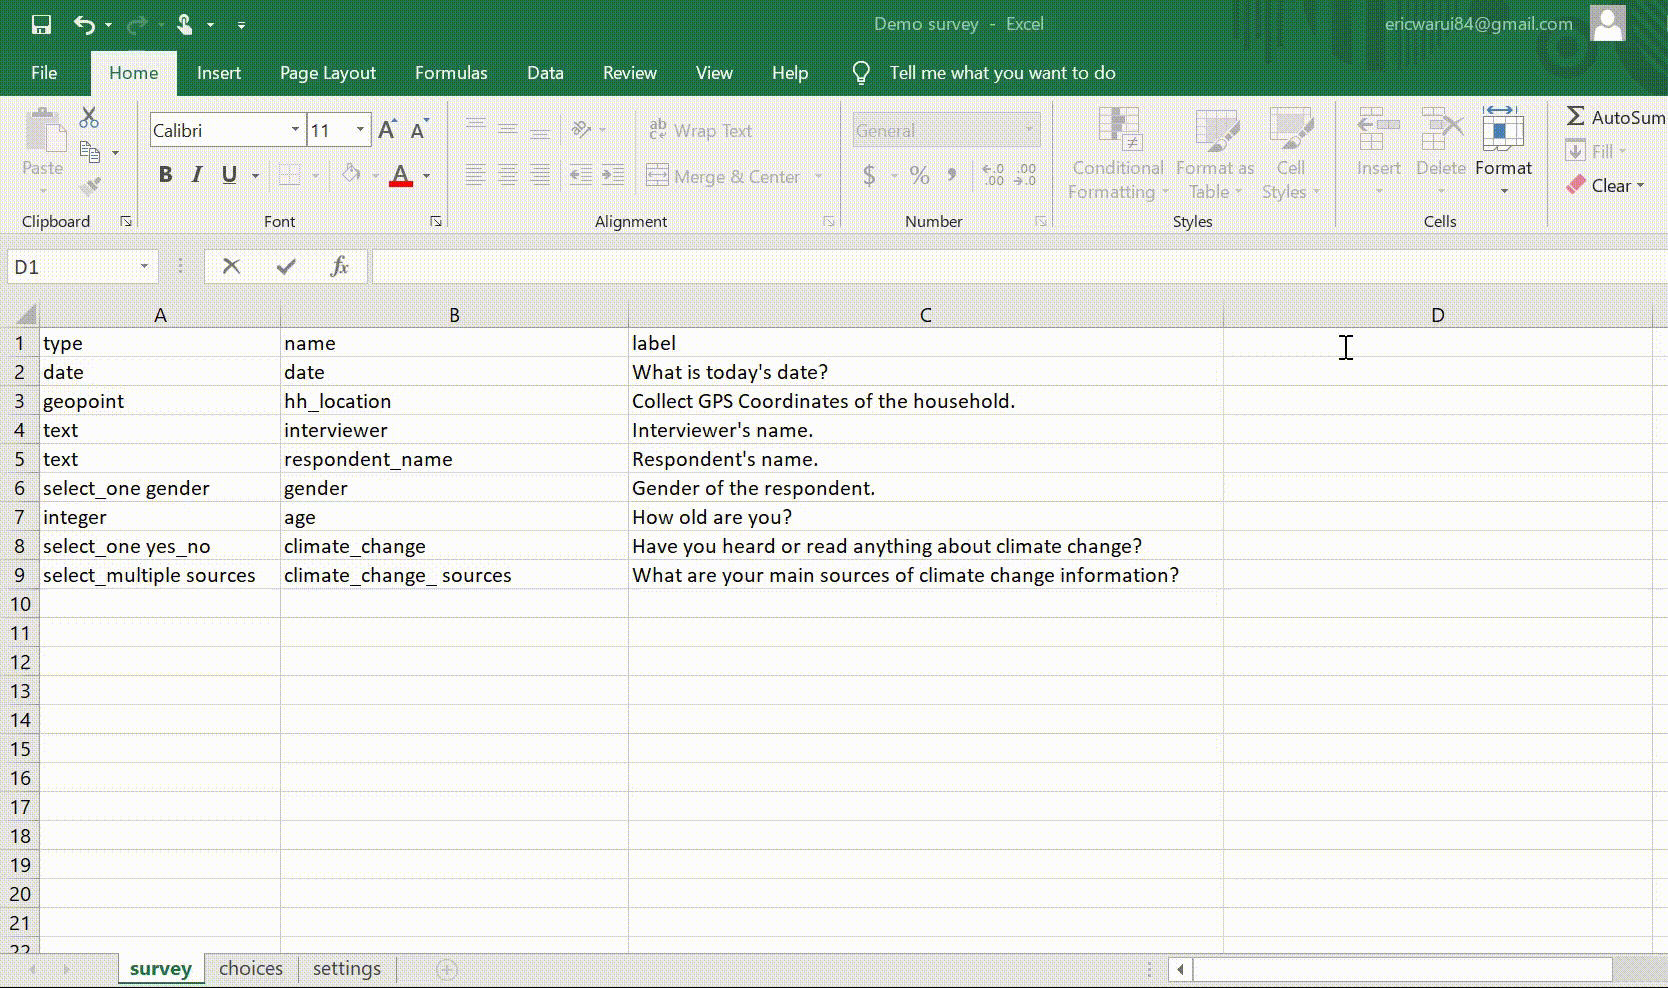
In the above example, the question, “What are your main sources of climate change information?’ would only appear if the question, “Have you heard or read anything about climate change?” is answered yes.
*Note 1:The ${ } around the variable climate_change is required in order for the form to reference the variable from the previous question.
*The unique names in the name column are called variables, and they are used to refer to the question.
How to use the relevant syntax for a select_multiple question:
*Note: The expression selected(${climate_change_sources}, ‘other’) is used because we want the question, ‘Specify other’ to appear only when ‘other’ is chosen as an option in the question, ‘What are your main sources of climate information?’
Remember to include other in the choices worksheet. For instance:
*Note: and, or, not can be used to combine various relevant logics.
Look at the illustration below using or as a relevant logic:

In the example above, the syntax used is selected(${aware}, ‘little’) or selected(${aware}, ‘a_lot’)
Look at the illustration below using not as a relevant logic

The syntax used here is not(selected(${aware}, ‘no’))
4. Calculation
To perform calculations in your survey you need the calculate question type and the calculation column.
Note: the calculate question will not be displayed on your survey form.
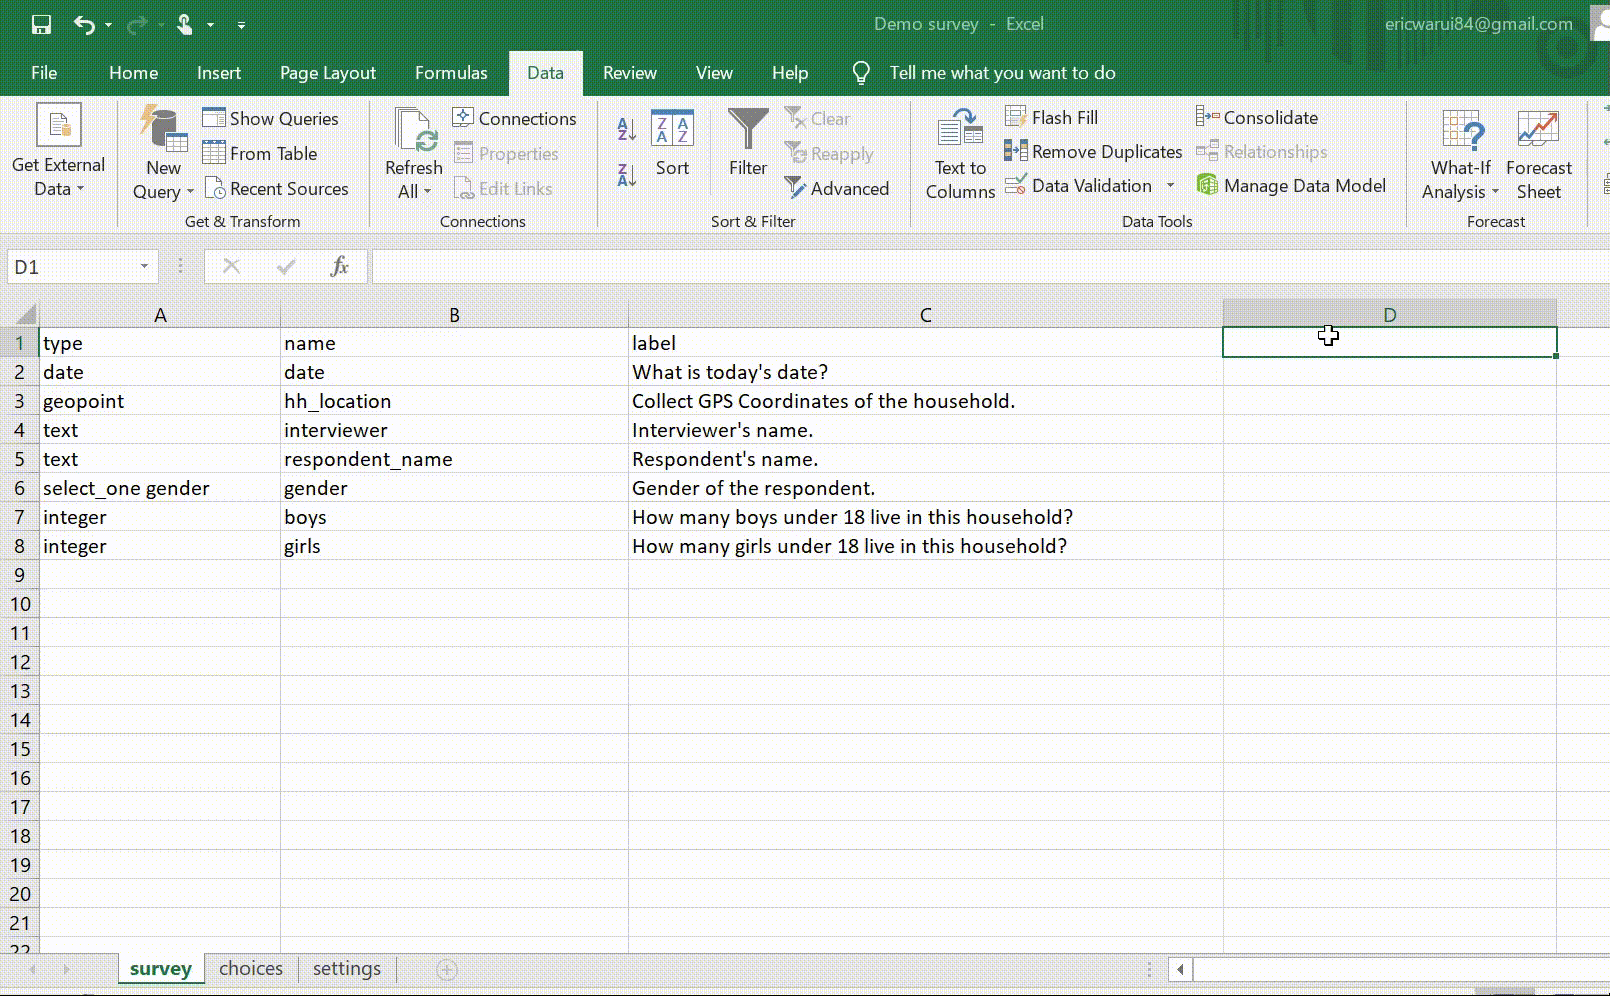
For instance: To calculate the total number of children in a survey, you would need to add the number of boys and the number of girls.
Step 1: Create a calculate column in the survey worksheet.
Step 2: Create a calculate question type, with variable name as total_children
Step 3: Insert the formula ${boys}+${girls}
The calculate question type will add the 2 prior questions with variable names boys and girls respectively.
Look at the illustration below:
Note: While you cannot see the calculation, you can “call” it in a label and present the results by writing ${total_children} in the label of a following question.
5. Required & Required Message
It may be required that some of the questions on the survey become mandatory. In doing so, the user will not be able to move on to the next question or submit the form without entering an answer for that question.
To make a question required:
Step 1: Add 2 columns: required and required_message to the survey worksheet.
Step 2: Mark questions as required by writing yes in the required column.
Step 3: Add a message on the required_message column.
Look At the illustration below:
*Note: Questions with a skip logic should never be made required, as not everyone may see the question, and a questionnaire cannot be finalised if not all required questions are answered. Thus, the error would never be visible to the respondent.
6. Multi-language Support
It is possible to add multiple languages in your survey form ( but having more than a few may make your survey a bit slower). To do this:
Step 1: In the survey worksheet, you will need to create multiple label columns. The first label column should contain the default language of the questionnaire, and should be written using the format, label::language1 (code). For example, label::English (en). The second label column will contain the language you want the form to be translated to, and should be written using the format, label::language2 (code). For example, label::Swahili (sw).
For the translation, it need to be exactly cell by cell, so what is written in cell C2 needs to be the exact same in cell D2, this is the way XLSForm is able to work with multiple languages.
Step 2: The same has to be done in the choices sheet.
Step 3: If there are messages for required, constraint and the hints, the same needs to happen. With (for example) hint::English (en) and hint::Swahili (sw), or required_message::English (en) and required_message::Swahili (sw).
Step 4: It is of utmost importance that the languages are spelled the exact same everywhere, otherwise ODK will understand it as two different languages and the matching does not work.
Note: To find the right 2 letter code for your language, have a look here (the Subtag).Using the correct code allows at Enketo to adjust buttons to the referred language (for most languages) and for right-to-left scripts to adjust to that too (for example for Arabic or Dari).
7. Range
To restrict integer or decimal inputs to a specific range, you can use the range question. This question can be used with 3 optional space-separated parameters: start, end, and step in a parameters column.
To add a range input to the survey form:
Step 1: Create a parameters column on the survey worksheet.
Step 2: Type out your question in the respective fields as shown below.
Step 3: In the parameters column, type in your start value, end value and step value.
Note: Step represents the interval between one range value and the next. Using a decimal step will result in decimal values being collected.
8. Metadata
XLSForm have a number of data type options available for meta data collection:
| Metadata type | Meaning |
|---|---|
| start | Start date and time of the survey. |
| end | End date and time of the survey. |
| today | Day of the survey. |
| deviceid | Unique client identifier. Can be user-reset. |
| phonenumber | Phone number (if available). |
| username | Username configured (if available). |
| Email address configured (if available). | |
| audit | Log enumerator behavior during data entry |
Note: Metadata is usually put in the beginning of the form.
Note: There are no labels associated with the metadata question types. As the variables are captured automatically, without them appearing on screen to the respondent.
Note: On the mobile phone for today and start/end to work correctly, you need to ensure that the phone’s date and time is set correctly, as it takes the phone setting for this.
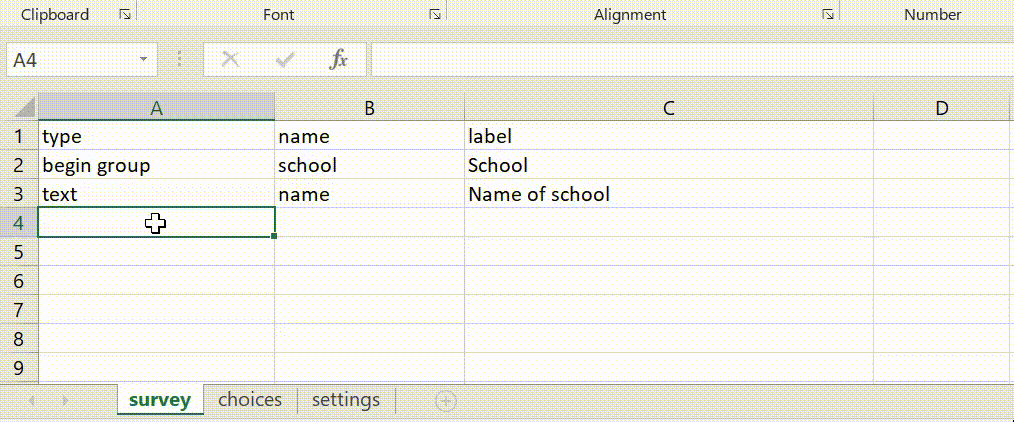
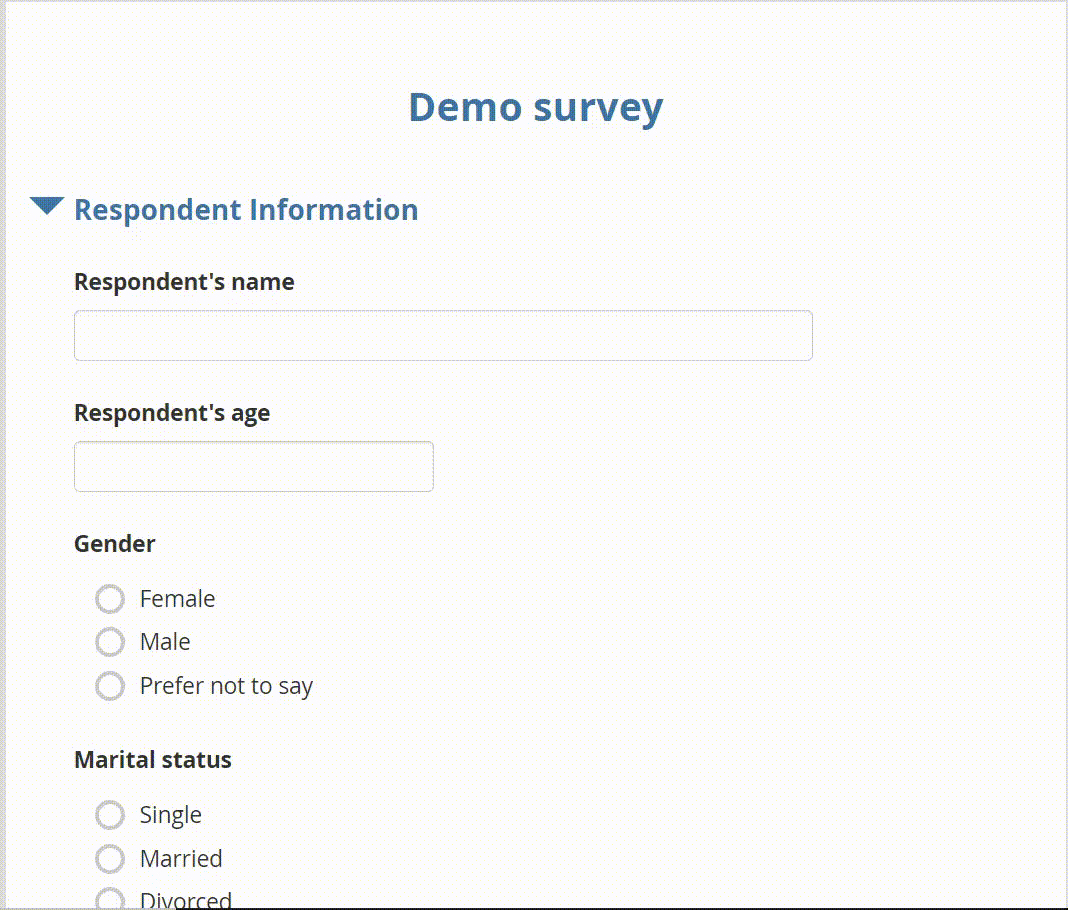
9. Grouping questions
Grouping questions is important as it puts related questions under one category/theme (including having a heading). This makes the survey look organised, and makes it easier for data export for analysis. Additionally, in XLSForm, groups can be used to have attributes, such as relevant or constraints done on the group level instead of every single question within a group.
Note: Depending on the service you are using with your XLSForm, you may have to write begin_group including the underscore.
Note: end group doesn’t require a name or label, because it is hidden in the form, but to help you match your begin and end groups, it’s a good practice to give it the same name as the begin group it belongs to. This is especially important when you nest groups.
Nestings groups
Groups of questions can be nested within one another:
10. Cascading Select
Cascading select questions are questions whose choices depend on the answers from previous questions. Cascading select questions help filter only relevant choices by simplifying the number of choices available to the respondent. For example, your form may first ask the region where a respondent is from, and then in the next question list only the towns and villages of that region. They are also referred to as choice filters.
Step 1: Create a choice_filter column on the survey worksheet of your XLSForm.
Step 2: Link the choices between the name of the question (column B) to the name in the choices spreadsheet.
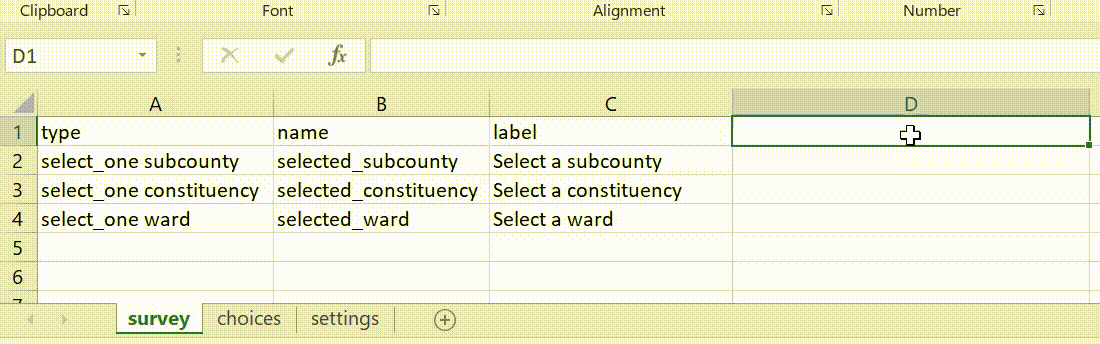
Step 3: Write the choice option in your list with the list_name as usual, but adding columns for the cascading. The column name here has to be the name you gave it in the choice_filter in the survey sheet. So, for the first example subcounty. Then subcounty become the column header in the choices sheet. The names you write in that new column (D), have to be the names you gave the sub-counties (column B). Have a look below.

Note: While here the list_name and the name of the cascade select (the new columns) is the same, this does not have to be the same.
11. Appearance
The appearance column allows you to change the appearance of questions in your form. The table below lists the possible appearance attributes and how the question appears in the form. Pay attention to which question types they are connected, as not every appearance option works with every type of question.
| Appearance | Question type | Description |
|---|---|---|
| multiline | text | Best if used with web clients, makes the text box have multiple lines. |
| minimal | select_one, select_multiple | Answer choices appear in a pull-down menu. |
| quick | select_one | Relevant for mobile clients only, this attribute auto-advances the form to the next question after an answer is selected. |
| no-calendar | date | For mobile devices only, used to suppress the calendar. |
| month-year | date | Select a month and year only for the date. |
| year | date | Select only a year for the date. |
| horizontal-compact | select_one, select_multiple | For web clients only, this displays the answer choices horizontally. |
| horizontal | select_one, select_multiple | For web clients only, this displays the answer choices horizontally, but in columns. |
| likert | select_one | Best if used with web clients, makes the answer choices appear as a Likert scale. |
| compact | select_one, select_multiple | Displays answer choices side by side with minimal padding and without radio buttons or checkboxes. Particularly useful with image choices. |
| quickcompact | select_one | Same as previous, but auto-advances to the next question (in mobile clients only). |
| field-list | groups | Entire group of questions appear on one screen (for mobile clients only). |
| label | select_one, select_multiple | Displays answer choice labels (and not inputs). |
| list-nolabel | select_one, select_multiple | Used in conjunction with label attribute above, displays the answer inputs without the labels (make sure to put label and list-nolabel fields inside a group with field-list attribute if using mobile client). |
| table-list | groups | An easier way to achieve the same appearance as above, apply this attribute to the entire group of questions (might slow down the form a bit). |
| signature | image | Allows you to trace your signature into your form (mobile clients only). |
| draw | image | Allows you to sketch a drawing with your finger on the mobile device screen. |
12. Grid Theme Forms
The theme-grid style allows your form to mimic the look of traditional paper surveys by compacting questions into one rows and columns. This style is best used with larger screens (e.g., computers or tablets) and will only work through Enketo, and not the app ODK/Kobo Collect.
To create a grid-theme on a survey:
Step 1: On the settings worksheet, create a column and name it as style
Step 2: On the style column, type out theme-grid
Step 3: On the survey worksheet, create a column called appearance (it’s not a new column, it is the same one, where all the appearances go).
Step 4: In the appearance column, input the desired width for each question field. The possible width is from 1 to 10, and it means in how many parts the full width of the survey is split. Based on that, it is possible to have questions appear next to each other. For that give a group (for example) a width of 6 with the appearance w6, then all the questions in that group (without a specific appearance set) will be 6, but that can be changed to 2, then having 3 questions of the width 2 would mean three questions are in one row in the table.
Note: The default width is 4, denoted as w4 if no group with a different with is set.. It requires some trial and error to get the hang of it in XLSForm.
The form would appear on Enketo as:

The style “theme-grid” by default transforms the question text to capital letters. However, it you do not wish to have the question in all-caps, simply type the following in the style column, theme-grid no-text-transform. The question shall now appear in sentence case.
13. Randomize
For any question type that shows a list of choices, the order of the choices displayed to the user can be randomized. To do this:
Step 1: Create a parameters column in the survey worksheet of your XLSForm.
Step 2: In the parameters column type out, randomize=true for the respective questions.(The American spelling is important here).
A seed can be created seed so the randomization for one person is always the same.
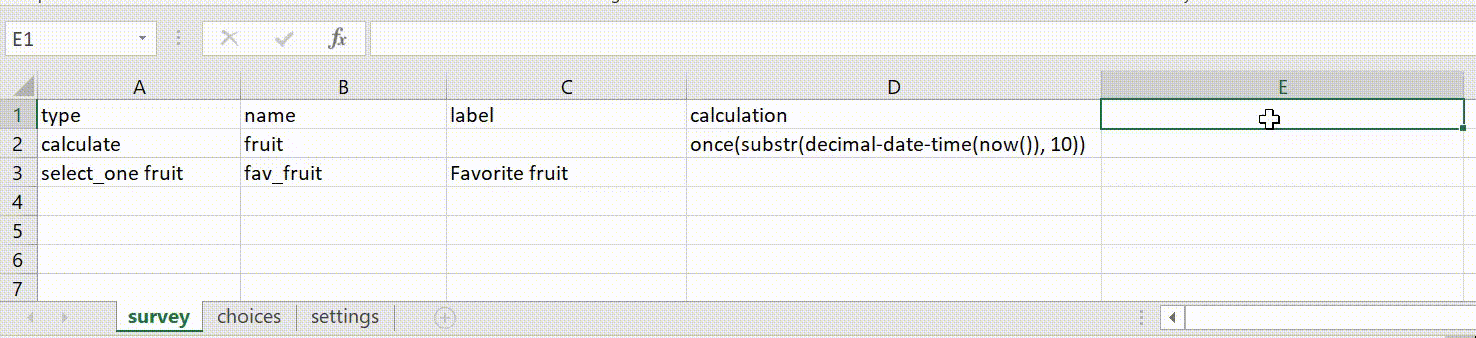
In the example above, the integer seed is created from the last 8 numbers of the decimal-date-time() which is unlikely to repeat across devices. In the seed expression, once() is important because it makes sure the seed is not changed if the same filled form is opened more than once.
Note: Randomization can be helpful to avoid a bias based on the order of answer options, as respondents often tend to chose the first and or last options they hear read out.
14. Media
You can include questions in your form that display images, or that play video or audio files.
Step 1: Create a media column on the survey worksheet of your form.
Step 2: Input the name of the media (image or video) you want referenced in the media column.
Note: If using the ODK mobile client for form submission, you need to put the media files that you want to include in the /odk/forms/formname-media folder on your phone, and then reference the exact file name in the media column in your form for Kobotoolbox, for ODKCentral, this is not necessary any more.

Note: To upload media to Kobo Toolbox: Login, then go to the settings tab of the respective survey, afterwards go to media and select the images, videos, audio files you would like to upload.

Note: Ideally you type the column names of the media files like this: media::audio, media::video, media::image. You can even combine media files with languages, having different videos playing according to the language of the survey selected: media::image::English (en) and media::image::Swahili (sw) from the previous examples.
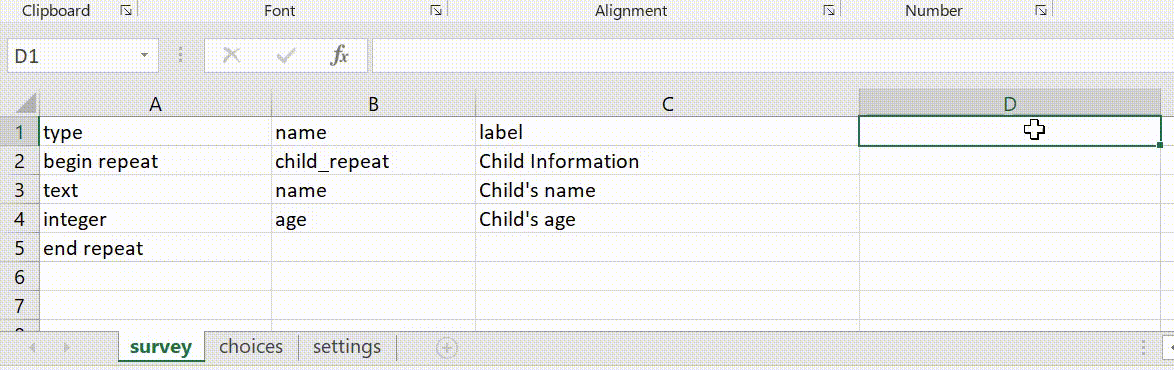
15. Repeats
A user can repeat groups of questions by using the begin repeat and end repeat construct. In general, this works like normal groups work, but all the questions within the group get repeated.
In this example, the name and age fields are grouped together in repeat, and the user can collect the same information about multiple children by selecting the option in the form to add another repeat.
Fixed repeat counts
Instead of allowing an infinite number of repeats, the form designer can specify an exact number of repeats.
This can be done by adding a repeat_count column on the survey worksheet, then specifying the number of repeats wanted.
In this example, exactly 3 repeats will be created.
Dynamic repeat counts
The repeat count can be set to an expression that refers to a previous field in the XLSForm.
In this example, the input for the hh_children field dictates the number of children repeats added: 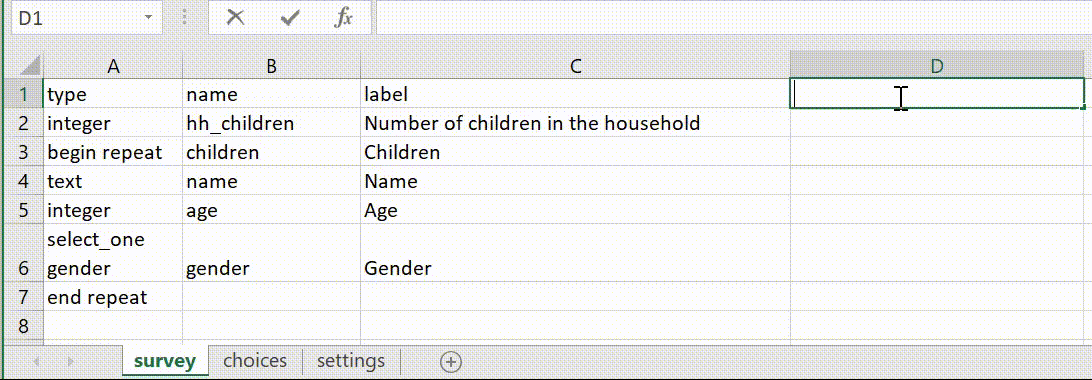
Repeats only with certain conditions
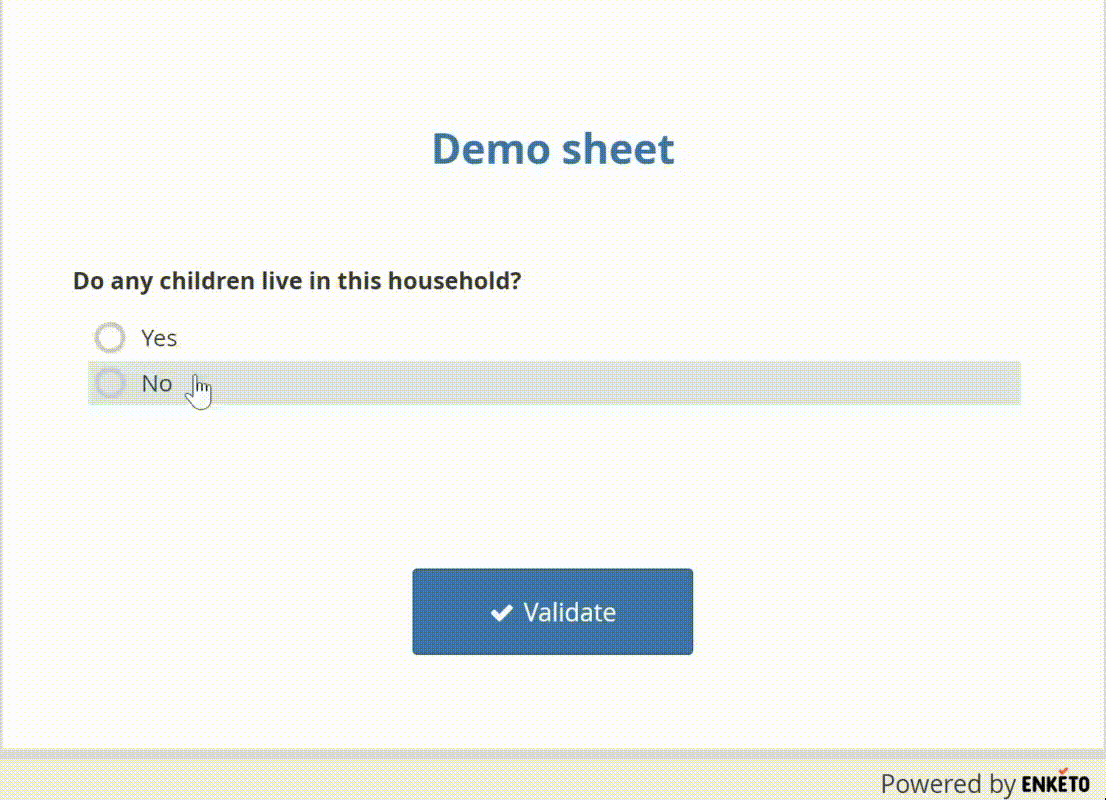
All questions in a repeat can be skipped based on some condition. In the example below, children can only be added in a repeat sequence if the proceeding question, “Do any children live in this household” is answered “yes”
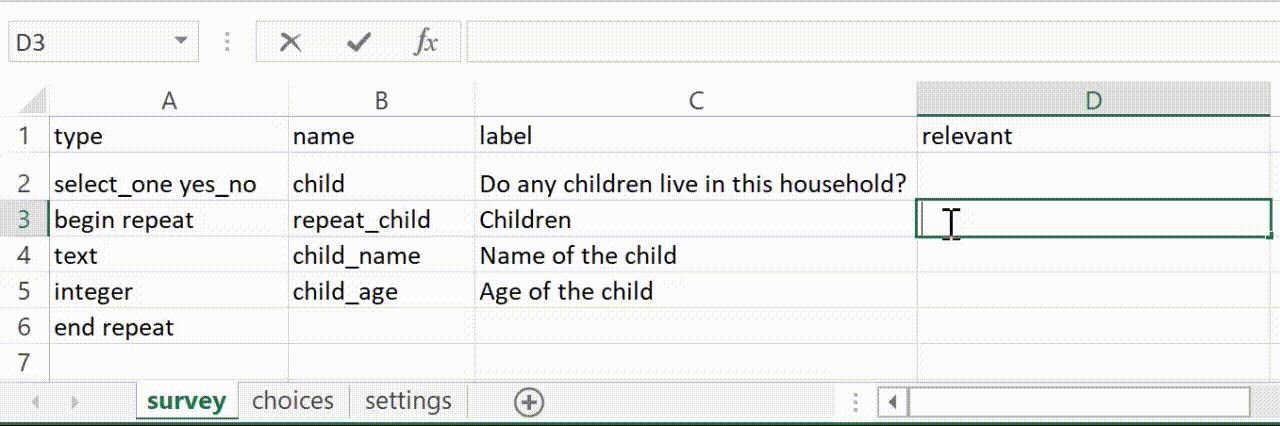
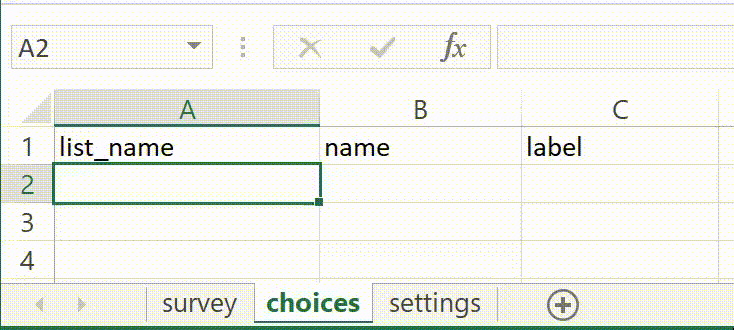
Remember to add answer options in the choices worksheet as illustrated below:
The question would appear on the survey as:
16. Multiple Webpage Forms
Web forms (using Enketo) can be split into multiple pages using the style theme, pages in the XLSForm.
Step 1: In the settings worksheet, create a column called style
Step 2: In the style column, type out pages
Pages are decided based on groups. Remember that similar questions should be placed in sections called groups, to organise your survey better.
To do this, a column called appearance is added, and in the column, the words field-list are typed in. This is meant to ensure that the questions appear on the same page.
The survey from would appear as shown below
Note: On the mobile phone app, field-list will also result in the question appearing on the same screen without swiping.
17. Default
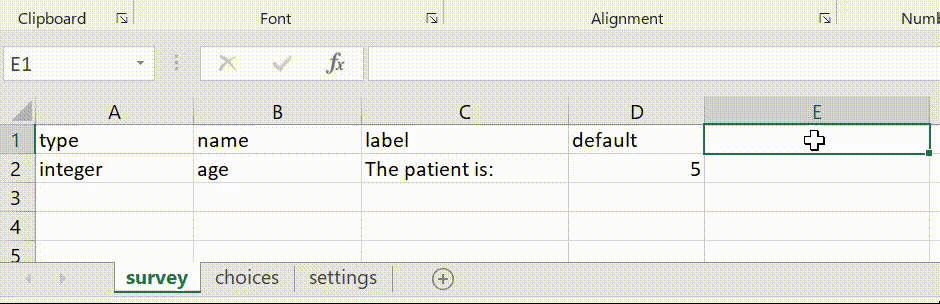
Adding a default field means that a question will be pre-populated with an answer when the user first sees the question.
This can help save time especially when the answer is one that is commonly selected, or it can serve to show the user the type of answer expected.
Step 1: Create a default column on the settings worksheet
Step 2: In the default column, insert your default settings
Note: The respondent can simply change the answer by tapping in the answer field and overwrite the default answer.
You can also add a default calculation, which will be calculated only once when the form loads, or if the question is inside a repeat.
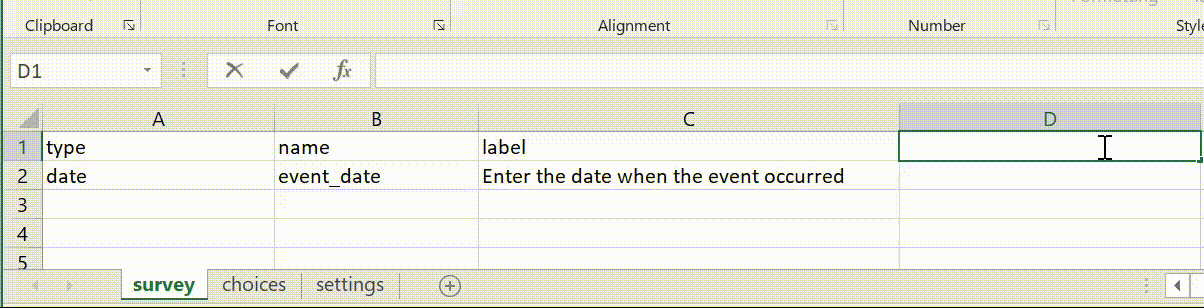
In the example above, the expression today() implies that the default date will be day when the event occurred.
Note: On the mobile phone for today to work correctly, you need to ensure that the phone’s date and time is set correctly, as it takes the phone setting for this, XLSForm only makes the connection, but does not store the information.
18. Read only
Adding a read only field means that a question cannot be edited. Read only fields can be combined with default fields to deliver information back to a user.
Step 1: Create a read_only column on the settings worksheet
Step 2: Type out your desired input in the read_only column
19. GPS with Accuracy Threshold
When recording GPS coordinates in ODK Collect (or Kobo Collect), ODK collect automatically collects the GPS when an accuracy level of 5 meters or less is reached. You can change this default behavior by specifying an accuracyThreshold; this could be less than 5m or more than 5m.
To do this:
Step 1: Add a column with heading body::accuracyThreshold on the survey worksheet.
Step 2: Specify your preferred accuracy threshold value for this column on your geopoint/geotrace/geoshape question of your XLSForm.
20. Trigger
A trigger column can be used to run a calculation only when the input of a question in the form changes. In other words, calculations are recomputed any time one of the values in its expression changes.
Step 1: Create a trigger column in the survey sheet.
Step 2: Input the trigger expression

In the example above, ${current_age} in the trigger column means that when the value of the current_age question is changed by the enumerator, the calculation for the diagnosis_age question will also change.
21. Specify Alternative Server
It is possible to specify an alternative server to send your submissions.
Step 1: Create a submission_url column on the settings worksheet.
Step 2: Input the URL meant to receive your filled form submissions.
Note: Make sure you use the full URL where submissions should be sent to including the path.
You should only do this if you are sure what you are doing. Normally, the tool you chose will automatically the needed parameters in the settings sheets.
22. Tools supporting XLSForm
- CommCare
- Community Health Toolkit
- DataWinners
- Enketo
- KoBoToolBox
- ODK
- Ona
- Secure Data Kit (SDK)
- Survey123 for ArcGIS
- SurveyCTO
- Tattara